T-posts are highly useful for installing light-duty fences such as garden fences. T-posts are quite sturdy to bear the weight of all wire fences. They are easy to install & remove, as they are designed to be directly driven into the ground, eliminating the need to dig post holes & set fence posts in concrete. They have a studded structure to attach different types of fencing material, making attachment easier.
Why are T-posts highly useful for installing garden fences?
Garden fences don’t have to bear a lot of weight & tension, unlike animal fences or perimeter fences. T-posts are sturdy enough to handle the weight of wire fences. They are easy to install & remove, hence helpful in building temporary or permanent garden fences.
In this post, we’ll guide you to construct garden fence using T-posts:
How to build a garden fence with T-posts?
First of all, measure the length of the garden to be covered & the height of the fence.
- Wire fences are most commonly used for garden fences, but wisely choose the mesh size according to the preying animals in your area.
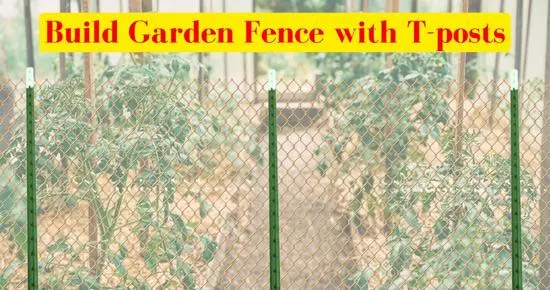
- Also, decide the T-post spacing (generally 8-12 feet) & drive T-posts using a post-driving tool with the flat side facing opposite to the garden.
- Then, use T-post clips, metal wire pieces, or zip ties to attach the fence to the T-posts.
- To keep small animals from entering the garden, cover the lower part of the fence with a small mesh size fence. To protect your garden against digging animals, bury the bottom of the fence or attach a hardware cloth horizontally at the bottom.
- Also, cover the top of the fence using a light mesh wire to protect your garden against birds.
- To hang a gate between the fence, install gate posts according to the gate’s length & use post hinges & gate hinges to hang the gate.
Follow the complete step-by-step guide below to install garden fence with T-posts:
Materials Needed:
- T-posts, long according to the height of the fence. For sturdy fencing, 1/3rd of the T-posts should be buried under the ground. So, choose the length of T-posts accordingly. For example, if your decided garden fence is 5 feet high, take 8 feet T-posts.
- Fence panels or wire mesh high according to the decided height of the garden fence.
- Fence clips, zip ties, or pieces of metal wire to attach wire fences to T-posts.
- A post driver or at least a sledgehammer
- Level tool to check the balance of T-posts.
- Gate
Step 1: Decide the area for the garden fence:
Measure the perimeter of your garden area(sum of the length of all sides). Use a measuring tape to measure the length of area to be covered. Also, decide the height of your fence based on your garden’s needs.
Step 2: Decide the height of the garden fence:
The height of the garden fence depends on the type of animals in your area. Depending on your geographical area, deer, rabbits, squirrels, gophers & raccoons are most likely to harm your plants & garden.
For example:
- If you are concerned about keeping animals such as goats or deer out of the garden, the fence should be 4-6 feet high.
- If you want to protect your garden against rabbits, the fence should be 3-4 feet high, as rabbits can jump 3-4 feet.
- However, the garden fence against chickens should be 4-5 feet.
In windy areas, taller fences can act as windbreaks, but they also catch more wind, which might lead to instability.
Also, consider the height of the plants you are growing inside your garden. If you’re growing tall plants or vines, a taller fence will be necessary to support & protect them and maintain a cohesive look.
Step 3: Best types of fences for gardens:
Wire mesh is most commonly used to make garden fences, as they are lightweight, easy to install & cost-effective. 1/2-inch to 1-inch mesh sizes are ideal for small birds, squirrels & gophers. A mesh size of 2 inches is useful against rabbits.
Step 4: T-post spacing for the garden fence:
As per my experience & general recommendation by experts, most animal fences & perimeter fences T-posts can be spaced at a maximum of 8-12 feet apart. However, I’ve experienced that by driving more part of T-posts, you can increase spacing slightly. T-post spacing also depends on the type of fence you are installing. You can increase spacing slightly for sturdy mesh wire fences such as high gauge welded wire fences, as they are less likely to sag than low gauge fences such as chicken wire.
To calculate the number of T-posts required, measure the length of the perimeter & divide it by the desired spacing between the posts. For example, if the perimeter measures 200 feet & you want to space T-posts 12 feet apart, you’ll need around 17 T-posts.
In a straight line, use stakes or markers to indicate where each T-post will be installed. Fence posts must be installed in a straight line to exert the same pressure on each part of the fence. Irregularly installed T-posts will apply uneven amounts of pressure on the fence. Make sure the distance between posts is consistent for stability.
As one-third of the total post length has to be driven into the ground mark, that part of the T-posts is for remembrance during installation. For stability, consider making the holes slightly wider at the bottom than at the top.
As the fence gets attached to the flat side of the T-posts. Ensure that the T-posts flat side faces outwards of the area to be covered. It’s because if the fence has to be installed for the predators (protected from outside), the fence should be installed to the outside of the posts, so if animals push against the fence, it doesn’t untie the posts.
Step 5: Install T-Posts:
One of the most important steps while installing any type of fence is to adequately drive T-posts. As soil in the garden is usually soft, you won’t require a heavy-duty tool. A T-post driver is the most practical DIY tool to drive T-posts, U-posts & round metal posts while installing most fences. If you are using a T-post driver, ensure it doesn’t stick with the T-post studs & bounces back.
A couple of years ago, I faced such an incident while installing a T-post fence in my garden. While pulling the T-post driver downward, its sharp end got stuck with the T-post stud & bounced back, hitting my head & as a result, giving me 9 stitches. So, you should also keep precautions while using a T-post driver.
However, you can use a large head mallet on soft ground if you don’t have a post driver. However, stand higher than T-posts at some distance & don’t lift the hammer excessively.
Use a level tool to check if the fence is straight or not. If you aim to install a gate between the fence, decide before installing the fence. Measure the length of the gate & install gate posts accordingly, leaving a couple of inches extra for hinges.
Note: It’s not recommended to set T-posts in concrete, as they are designed to be directly driven into the ground
Step 6: Attach Fence to T-posts:
Unroll the fence panels or wire mesh roll along the outside of the T-posts. Start from the corner post & attach the fence to the T-post at a regular interval of 1 foot from top to bottom. Keep the fence stretched from top to bottom & make sure the fence touches the ground.
Use fence clips or zip ties to secure the wire fence to the T-posts. As an alternative, I’ve personally used pieces of metal wires to attach wire fences to T-posts for my garden fence, and it works perfectly well. Wrap the metal wire pieces around the fence wire & T-post & twist the ends of the metal wire around each other.
At last, trim the excessive wires to prevent injuries. Similarly, move toward the next post, stretch the fence with your hands, or use a fence stretcher tool, But don’t over-stretch the fence as it’ll lead to breakage.
Similarly, attach the fence to each T-post at regular intervals using T-post clips, metal wire pieces, or zip ties. If you are using zip ties, make sure to use heavy-duty UV-resistant zip ties, as regular zip ties wear off under sunlight & can’t bear wear & tear.
After one side is covered, terminate the fence at the corner post. Then, start the other side of the fence from the same corner post & cover all the sides.
Ensure every corner of the fence is covered & there is no gap for small animals to enter.
How can you keep small animals from entering the fence & digging under?
If you are using a large mesh-size wire fence, it’s wise to cover at least the lower part of the fence with a small mesh-size fence to prevent small animals from trespassing into your garden fence.
To prevent animals from digging under the fence, either burry the lower part or attach a wire fence horizontally at the bottom of the garden fence.
Step 7: Hang a gate between the fence:
It’s also necessary to install a gate between your garden fence so you can easily access your garden whenever needed. For this, measure the length of the gate & install gate posts according to the distance, plus leaving a couple of inches for the hinges. Although it’s better to use heavy-duty wood posts for gates, T-posts are also quite sturdy & supportive hardware, such as T-post hinges, is available to attach gates directly to T-posts.
You’ll need two gate hinges & two T-post or wood post hinges. Mount gate hinges on the gate & install post hinges at the exact height on the post. At least hook the hinges & make them tight on the spot.
Step 8: Cover the Top:
Most birds, like sparrows, starlings, crows, blackbirds & even hens, like to eat fruits & plants; hence, they’ll damage your garden. That’s why Covering the top of the garden fence is essential to keep your plants safe from birds. To cover the top, you can use any medium gauge wire fence, such as chicken wire or welded wire. One method I’ve used to cover the top of the fence is by installing tension wire & tying the ends of the wire fence to it.
Tension wire is tightly installed between the corner posts. Then, you can attach the vertical wire fence & the top horizontal fence to that tension wire. It’ll cover the top and keep the vertical wire fence from sagging. To attach wire fences to tension wire, you can use zip ties or pieces of metal wire.
Step 9: Inspect the fence after installation:
Double-check that everything is secure and tightly fastened. Ensure there is no gap in the fence & gate so small animals can’t enter the fence. Trim any sharp metal wire sticking out of the fence.
Effective tips to keep your garden safe from preying animals
Here are some useful strategies to help you deter preying animals from accessing & damaging your garden:
- Some plants naturally repel animals. For example, marigolds, lavender, and garlic can deter various pests. Plant these around the perimeter of your garden.
- Plant thorny shrubs or bushes like roses or barberry near the fence. These act as a natural deterrent, especially for animals that like to squeeze through tight spaces.
- Installing a couple of electric fence wires can be highly effective in deterring large-sized animals like bears or deer & keep your garden safe. Also, for smaller animals, an electric fence wire at the bottom of the wire fence can act as an effective deterrent. This provides a shock when touched, discouraging animals from attempting to breach the fence.
- Apply commercial animal repellents, which are available in spray or granule form. These products emit scents that animals find unpleasant. Or you can create your own repellents using natural ingredients like garlic, pepper, or vinegar mixed with water. Spray this mixture around the garden perimeter to deter animals.
- Install motion-activated sprinklers that spray water when they detect movement. These are effective for repelling small to large animals and can be placed along the fence line. Ultrasonic devices emit high-frequency sounds unpleasant for animals but usually inaudible to humans.
- Remove fallen fruits, vegetables, and other food sources. Regularly clean the garden area to minimize the appeal to animals.
- Seal any gaps or holes in existing fences, sheds, or other structures where animals might gain access to your garden.
Conclusion
When working with fencing material, remember to wear appropriate safety gear, such as gloves and safety glasses. Building a garden fence with T-posts is quite a straightforward and effective way to protect your garden from animals and enhance its security.
You must drive 1/3rd of the T-posts at regular intervals of 10-12 feet, keeping the flat side facing outward. Then, use T-post clips, zip ties, or pieces of metal wires to attach wire fences to T-posts.