There are several ways to electrify a chain link fence. The easiest way to electrify a chicken wire fence is by installing electric fence wires offset (around) the chicken fence. Both fences must not touch each other. This method does not use chicken wire fences in the electric fence circuit. The electric fence wires surrounding the enclosure & keep people away.
The second method involves using a chain link fence as the ground part of the electric fence. Around the chicken fence, we have to install electric fence wires. Both fences must be insulated from each other and everything around them. The chicken wire connects to the ground terminal & the electric fence wires connect to the live terminal. When a bird or animal approaches the fence, he contacts both fences. The circuit completes & a shock is delivered.
In another way, if you can keep the chicken wire from touching anything, i.e., fence posts & ground using extended post insulators, you can electrify the chicken wire fence by connecting it to the energizer’s live terminal.
Below we’ll explain how to electrify a chain link fence.
How to electrify a chicken wire fence:
The chicken wire fence can be used as the ground or live part of the circuit if you can keep it insulated from the ground, grass, fence posts & everything to avoid short circuits & power loss. Although chicken wire fences provide a great deal of security, it is quite hard to prevent the fence power from running out when it gets into contact with objects.
Therefore, it is better & easier to install electric fence wires around/offset chicken wire fences. In this method, the chicken wire fence is not part of the circuit. Using extended post insulators & chain link insulators, you can install the electric fence wires on the same posts as chicken wire fences. Alternatively, you can install temporary or permanent fence posts a few inches apart. Both fences must be insulated from each other.
Follow the complete step-by-step guide
Method 1: Install electric fence wires around the chicken wire fence:
We’ll install electric fence wires around the chicken wire fence in this method. For this purpose, we can install extended post insulators on the existing posts or drive separate fence posts.
Extended post insulators, or offset insulators, are plastic and extend a few inches above the fence posts.
Hence they can keep electric fence wires insulated from the chicken wire fence & the posts. However, buy post insulators according to the fence post types.
Step 1: Choose the right fence post insulators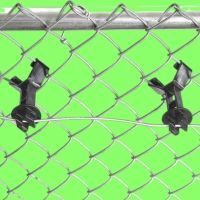
Wood post insulators get screwed in. While T-posts, U-post & round post insulators get mounted(clipped) over the body. Ensure that both fences are tight so they don’t move & touch due to wind.
If you’ve installed gates between your fence, terminate the wires at both gate posts. It’s advisable to run an insulated wire under the gate & connect the strands at both ends of the gates to ensure better current conductivity in the entire fence.
When the chicken wire fence is used for grounding, ensure the hot wires are positioned correctly so a person approaching the fences can easily come into contact with both fences. So the circuit completes & delivers shocks.
Step 2: Select a suitable electric fence energizer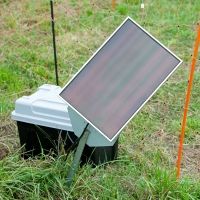
If setting up an electric fence for chickens, follow these tips while selecting a charger.
- Compare distance rating:
Measure the length of the fence enclosure using measuring tape. Now multiply te distance by the number of strands to know how much total wire is required. Then compare the length of the wires with the energizer’s distance rating & verify if it can electrify all fence wires.
Usually, chicken fences are installed in small areas so you won’t need a heavy-duty energizer. Also, decide on the number of strands and the type of wire, such as metal, poly wire, poly tape, etc.
- Check joule & voltage rating:
Look for energizers specifically designed for poultry or small animals. They should provide low power output, 1-2 joules are efficient. High-power energizers meant for larger livestock may be too strong and potentially harmful to chickens.
Opt for energizers that can power at least 3000-5,000 volts. Shorter pulse durations, around 200-300 microseconds, are also suitable for chickens.
- Power supply options:
Consider whether you prefer a battery-operated or a mains-operated energizer. Battery-operated energizers offer flexibility in placement but require regular battery maintenance.
In contrast, mains-operated(AC) ones provide continuous power but require access to an electrical outlet.
Solar-powered fence energizer feed on sunlight & eliminates the need for a power source. However, they are not as long-lasting then AC fence chargers.
Research reputable manufacturers and read customer reviews to ensure the energizer you choose has positive feedback and a track record of safety and reliability.
Ensure the energizer is designed to withstand outdoor conditions and has a reliable performance even in challenging weather. Look for models with waterproof or weatherproof enclosures and solid construction.
However, If you install an electric fence to keep predators from accessing the chicken fence or your property, use a heavy-duty fence charger. Choose a charger that can output 1 joule per mile and at least 5KV(5000 volts). For example: To cover 6 miles of fence wires, use 6-joule fence chargers.
Step 3: Install electric fence grounding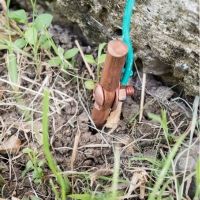
Grounding is the most important part of an electric fence circuit. Most electric fence issues faced daily are due to insufficient grounding or weak connections. That’s it’s essential to take care of each step while installing grounding for the electric fence.
Whether you’ve connected the chicken wire fence to the grounding or not, installing ground rods to catch the charges that leak in the soil is helpful.
In this way, the electric fence will also deliver shocks when someone touches the fence standing on the ground, even without touching both fences.
Tips for proper electric fence grounding:
- Use high-quality galvanized steel rods for grounding electric fences.
- Drive the first ground rod within 10 feet of the energizer.
- Install all ground rods 10 feet apart from each other. Leave a couple of inches out of the ground.
- Use high-quality insulated wire & galvanized steel ground rod clamps to connect ground rods.
- Insulation prevents short-circuiting & prevents leaking of the fence power.
Step 4: Setting up fence charger:
After the fence wires & ground rods are installed, hang your fence and energizer in a dry shady & airy place. If you have a solar energizer, place it somewhere with sufficient sunlight access.
Use a highly conductive & insulated wire to connect the fence charger. Twist one end of the wire around the energizer’s live(+ve) terminal & the other end to the live fence wires. Connect the second wires between the ground terminal & the ground rods.
Method 2: Use chicken wire fence as electric fence grounding:
In this fence circuit, we’ll use chicken wire as the ground part of the electric fence. This electric fence circuit works such that the chicken wire fence is insulated from everything and is connected to the ground rods or the energizer’s ground terminal.
Live fence wires are connected to the positive terminal of the energizer. They are installed a few inches away & kept insulated from the chicken fence.
So when a predator tries to pass through the electric fence to the chicken fence, he contacts both fence wires. The circuit completes & the current starts, passes from the live fence wires to the body & returns back to the energizer via the chicken fence wires. In reaction, they receive shock pulses.
You can also install ground rods to deliver a shock when someone on the ground only touches the wires of the electric fence. Ground rods complete the circuit & collect residual charges from the soil, return them to the energizer & improve your fence power.
The most important point is to keep both fences stretched and insulated from everything that drains power, i.e., fence posts, ground, grass & metal objects.
For this purpose, the only option is to install the chicken wire fence on wood posts. You can also use post insulators to keep chicken wire insulated from posts & ground.
However, fence post insulators are designed to hold electric fence wires, not wire fences. Hence it’s quite difficult to keep chicken wire fences insulated from earth & fence posts.
Frequently Asked Questions
What voltage is needed for an electric fence for poultry?
The voltage needed for an electric fence for poultry is typically around 4,000 to 5,000 volts.
How to electrify a chain link fence?
As you know, chain link fences are heavy & installed adjacent to fence posts, so they are susceptible to short circuits. That’s why you should install electric fence wires a few inches from the chain link fence. Both fences must be insulated from each other. The chain link fence is not included in the part of the circuit. For this purpose, we can install electric fence wires on the same fence posts using extended & chain link insulators. Or you can drive separate fence posts for the electric fence wires a few inches away.
Conclusion
You can directly electrify a chicken wire fence, but make sure that both fences are insulated from each other, fence posts, earth & anything that can create short circuits & drain fence power.
That’s why installing electric fence wires offset to the chicken wire fence is easier. In this fencing method chicken wire fence is not part of the electric fence.
We’ve to install electrified wire insulated from the chicken fence wires. For this purpose, we can use extended/offset post insulators on the same fence posts or install separate fence posts.
Read the complete guide above & if you still need any assistance, ask us in the comments below.