Usually, fence post clips are used to attach wire fences to T-posts. The fence clip wraps the fence & t-post, and its hooks are twisted(bent) over the fence wires. But, as you know, a chicken wire is made of thin wires. So if we use fence post clips with a chicken wire, it’ll break.
That’s why zip ties or pieces of metal wire are ideal for attaching chicken wire fences to T-posts. Attaching chicken wire to the T-post is easy you just have to keep the fence stretched & use the right sturdy material for attachment.
How to attach chicken wire to T-posts?
- Start from a corner post. Unroll the chicken wire fence. Vertically align the fence along the flat side of T-posts. Make sure the fence touches the ground.
- Wrap the chicken wire around the corner/starting post. We can use zip ties or pieces of metal wire (if no other stuff is available) to attach your chicken wire to the T-posts.
- Start at the top of the fence. Tie the fence on each T-post at regular intervals (maximum one foot). Place zip ties or metal wires over the T-post studs (hooks) to keep them from sliding.
- Maintain the same pattern of boxes from top to bottom to keep the chicken wire fence stretched and straight.
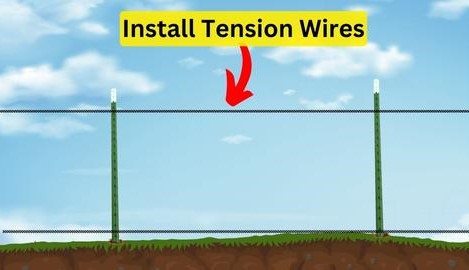
- Install tension wires tightly between the corner posts at multiple heights to keep the chicken fence from sagging. Then attach the chicken wire to the tension wire using zip ties or metal wire.
- To keep animals from digging, attach a 2-foot additional chicken fence horizontally at the bottom of the existing chicken fence.
Follow the step-by-step guide below:
Step 1: Gather the necessary materials:
Besides T-posts & chicken wire fence, you will need zip ties or metal wire, pliers, and wire cutters. Also, wear protective gloves for safety.
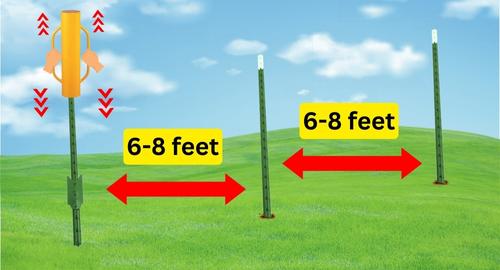
Step 2: Install T-posts:
Determine where to install the chicken wire fence and mark spots on the ground to install T-posts. A manual post driver is mostly used to drive T-posts. Install all T-posts along the line at regular intervals(8 feet max), ensuring they are securely driven in the ground.
If you want to hang a gate between the chicken wire fence, measure the length of the gate. Then install T-posts for the gate according to the measured length plus a couple of inches for the gate hinges.
Step 6: Keep the chicken wire straight & prevent sagging:
To keep the chicken wire fence straight & stretched, it’s a great idea to tightly install metal wire(tension wire) between all the corner posts. Then we’ll attach the chicken wire to the tension wire. This way, you can keep the chicken fence straight by installing tension wire at the bottom, top & center(if desired). However, you’ll have to install tension wire before attaching the fence to the T-posts.
Note: Heavy-duty posts at the corners are ideal to install tension wires, as T-posts will bend.
Follow steps:
- Mark all corner posts at the top or bottom of the fence. Tie a metal wire stretched at the marked height between the corner posts.
- Keep the wire stretched as much as possible. To keep the metal wire in place, tie it to each post at the same height.
- Then attach the chicken wire to the metal wire using zip ties or pieces of metal wire.
- Attach the metal wire to the chicken wire regularly (every foot). These ties should be slightly loose to allow movement.
- Similarly, you can install multiple metal wires at regular intervals (2 feet) on the T-posts or wood posts to provide added stability to the chicken fence.
- Adjust for any sloped or uneven ground by kicking the bottom of the fence outwards and using your foot to pull it down to tighten it.
Step 3: Unroll the chicken wire:
Start at one end of the fence line, lay the chicken wire roll horizontally on the ground, and open it along the posts. Now align the fence vertically & temporarily hook it to the T-posts so it doesn’t fall while installation.
After the side of the enclosure is covered, leave some excess wire at the beginning and end to allow for adjustments.
Step 4: Attach chicken wire to the T-posts:
To attach a chicken wire fence to T-posts & tension wire, we can use zip ties or pieces of metal wire. Zip ties are made of plastic. They are sturdy & serve you for at least a year. They are quite inexpensive & usually a pack of 100 costs around 10$. However, make sure to choose UV-resistant zip ties, as simple plastic will degrade in sunlight.
Other than zip ties, you can also use pieces of metal wires that are commonly available in the home’s toolshed. You can also buy metal wire as a 50-100 foot coil also costs around 10 $ which would be more than enough for attaching chicken wire with T-posts.

How to connect chicken wires?
If the chicken wire ends in between the fence line, overlap both ends of chicken wire over each other around 1 foot. Use zip ties to attach the both ends to the fences.
Steps:
- Hold the chicken wire along the first T-posts, ensuring the fence touches the ground & is stretched from top to bottom.
- Take long & sturdy zip ties & thread them through the holes in the chicken wire and around the T-post. At last, tighten them securely but don’t tighten them too much.
- Similarly, if you want to use metal wire to attach chicken wire to T-posts take 6-7 inch pieces, and wrap them around the chicken wire mesh & the T-posts. On the opposite side, twist both ends of the metal wire using a plier. For safety trip the extra ends or bend them inward.
- Use zip ties or metal wire at regular vertical intervals of 12 inches maximum to provide adequate support & securely hook the fence.
- To keep the fence straight and stretched, keep the same patterns of chicken wire mesh from top to bottom on the T-posts. For this purpose insert a screwdriver in the chicken wire mesh along the T-post & leverage the fence horizontally.
- Once you have attached the chicken wire to all the T-posts, use wire cutters to trim any excess wire that extends beyond the last T-post.
After the whole fence is installed, walk along the fence line to ensure the chicken wire is securely attached to each T-post. Make any necessary adjustments & tighten the attachment wires/zip ties as needed.
My Opinion:
I’ve used both tools, zip ties & metal wire to attach wire fences to metal posts, and both work fine. Zip ties give a smooth & nicer look
to the fence but they may wear off due to tension & sharp edges of chicken wire. That’s why you should invest in heavy-duty, UV-resistant zip ties for long-lasting results.
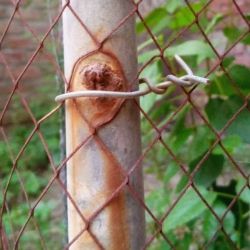
Metal wire pieces are the ideal tool to attach chicken wire fences to metal posts. Metal wires are quite sturdy & they last the longest.
Take a look at this: I used metal wire pieces to connect the chicken wire to round metal posts (not T-posts) while protecting a section of my backyard vegetable garden. It’s been up for over a year, and those joints are still holding strong
Step 7: Keep animals from digging under the chicken wire fence
You can prevent animals from digging by connecting 2-3 feet of chicken wire or any other hardware cloth horizontally at the bottom of the chicken wire using metal wire or zip ties.
Or you can dig one feet trench along the fence line & bury the chicken wire into it before attaching it to posts. Or after attaching to posts, vertically attach a piece of hardware cloth at the bottom of the chicken wire fence & bury it in the trench.
Conclusion
We can use zip ties or hard metal wires to attach chicken wire fences to the T-posts. To keep the fence straight, stretched & sturdy, install metal wire tightly around the enclosure & attach the chicken fence.
Secure the bottom of the fence from digging animals by attaching an extra piece of chicken wire(2 feet) along the bottom of the chicken fence.
For any further assistance, ask us in the comments below.