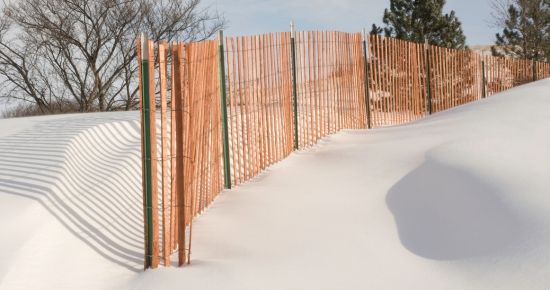
Snow fences can be installed with any type of posts, i.e., wood or metal posts. But as you know, T-posts are easy to install, last longer in moisture than wood posts & are can be removed & reused. However, the main thing is to make a secure attachment between the fence & the post.
Below we’ve discussed in detail how to install & attach snow fences with T-posts.
How to attach snow fences to T-posts?
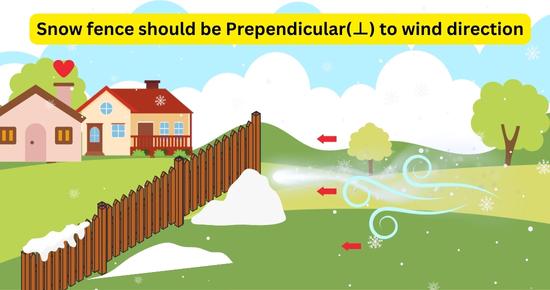
- Fences should be installed perpendicular to the wind direction.
- Place the fence upwind side of the T-posts(from where the wind is coming) to prevent the fence from untying.
- Keep the fence slightly above the ground(10-15% of the fence height) to avoid burying it under the snow.
- Zip ties are commonly used to attach snow fences & wire fences to T-posts. However, ensure the zip ties are treated for use in harsh cold weather. However, we can also use pieces of hard metal wires to tie the snow fence.
- Keep the fence stretched from top to bottom. Tie the fence 3-5 times on each post at regular intervals(1 foot).
- If installing a plastic snow fence, it’s advisable to sandwich the fence between a wood lath & the level side of the T-pots to prevent wear & tear due to heavy winds & the material used to tie the fence.
- As per research, an 8 feet fence can protect an area against 29 inches (74 cm) of annual snowfall.
Here’s a complete guide to installing snow fence with T-posts:
Step 1: Choose the right snow fence
Snow fences are available in wood pallets & plastic. They are available in various lengths, typically ranging from 4 to 8 feet. However, it’s recommended to install 8 8-foot fences to block more snow from accessing your property, driveways & roads.
Wood Vs. Plastic snow fence
Wood fences are favored for their sturdiness. However, they require regular maintenance such as painting & staining to prevent rotting.
Plastic snow fences are lightweight, easy to install & stretch as they are 4 times lighter than the wooden fence. Plastic snow fences need low maintenance & they are resistant to rot and insect damage. However, in some cases, grazing animals may chew the plastic fence. Also, the plastic fence may undergo wear & tear or breakage due to extensive tension caused by the wind & rubbing with the wire or zip ties used to tie the fence to the posts. Hence they require regular check-ups.
Price:
A 4-foot high and 50-foot long wood snow fence roll costs around 100 $. While a 4-foot high, 100-foot long plastic snow fence costs around 40$.
Hence plastic snow fences are preferred due to their cost-effective, lightweight, easier installation, low maintenance & rott proof capabilities.
How do snow fences work?
Snow fences are used to prevent snowdrifts by controlling the spread of snow on the roads. By strategically installing snow fences in the direction of the wind, they cause snow to accumulate near the fence and prevent it from piling up in unwanted locations such as roads, driveways, or walkways. It helps prevent snow blockages, improves visibility & minimizes the risk of hazardous driving conditions and snow-related accidents, and reduces the need for costly snow removal.
Additionally, snow fences can be employed for agricultural purposes, acting as windbreaks to protect crops, livestock, and farm infrastructure from the damaging effects of strong winds and drifting snow.
Step 2: Analyze the wind direction
Analyzing the wind direction forecast will be helpful in strategically installing the fence. The fence should be installed perpendicular to the wind. For example, if the wind is blowing from north to south, the fence should be installed between east and west(perpendicular).
Step 3: Snow fence placement
As per research, “The maximum length of a snowdrift could reach 20-35 times the height of the fence. Therefore the fence should be installed at a distance of 35 times the fence height away from the property you wanna protect, toward the wind source(from where it’s coming). For example, a 4-foot fence should be installed 140 feet upwind(against the wind direction) from the property you want to protect.
Step 4: Drive T-posts
As the snow fence has to bear harsh weather & heavy winds, it’s recommended to drive 1/3rd of the T-posts underground. Hence choose the size of the T-post according to the fence height.
For example: If the snow fence is 4 feet, you should buy 7-8 feet posts. Because a few feet will be driven into the ground. Also, the fence is installed a few inches above the ground.
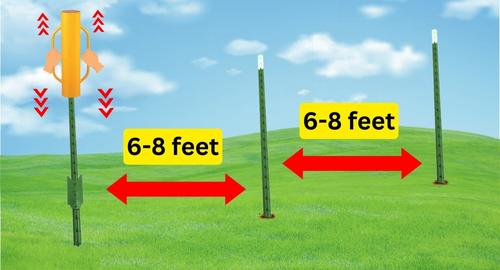
T-post spacing for snow fence:
T-posts should be spaced no more than 6-8 feet apart for snow fences.
Tools for driving T-posts:
We can use several tools to drive T-posts, such as:
- A heavy metal pipe closed from one end
- As per my experience, a manual post driver is the most effective tool for driving T-posts on any type of ground.
- An automatic post driver is ideal for installing a large number of posts.
- A tractor/loader equipped with a bucket works as an alternative to a heavy-duty post driver.
Keep the flat side of the T-posts toward the wind source. Make sure to keep the T-post straight while installing. Check the post alignment using a level tool.
If the ground is hard, installation may take time & you may need heavy-duty tools, i.e., an automatic post driver or a tractor bucket, especially when installing many T-posts.
Step 5: Attach snow fence to T-posts:
After installing T-posts, it’s time to attach the snow fence to the posts. For attaching snow fences to T-posts, we can use zip ties or pieces of metal wires. Keep the fence stretched from top to bottom and tie the snow fence to each post 3-4 times at regular intervals.
If you want to use zip ties, opt for cold-weather zip ties as they are designed to perform up to -40C. Simply wrap them around the T-post & the wood lath or wooden fence & zip them tight.
While, if you want to use pieces of metal wire to attach snow fence to T-posts, simply use a thick gauge such as 10-12 gauge steel wire. Wrap them around the T-post & the fence. Then use pliers to twist the ends of metal wires. At last, bend the edges of the metal wire inwards or trim the excess for safety.
Similarly, make attachments at regular intervals at every foot. Then, head toward the next post and stretch the fence horizontally. Starting from the top, tie the fence to the T-posts at regular intervals.
A few key points should be kept in mind while attaching fences to T-posts
1: Keep the fence above the ground
Keeping the snow fences a few inches above the ground is advisable. The rule is to keep the fence above the ground 10-15% of the fence height. For example, if the fence height is 4 feet(48 inches) keep the fence at least 6 inches above the ground.
It’s because as snow piles up, it turns into hard snow drift. If the snow fence is touching the ground, it’ll get buried under the snow. It could result in deforming the fence shape, sagging & ultimately making it ineffective.
2: Sandwich the fence
If you are installing a plastic snow fence sandwich it between the flat side of the T-post & a wood lath to keep it from damaging from wear & tear caused by rubbing with the tying material(zip ties or metal wire).
Tips to keep snow from drifting on the driveway
Here are some tips for keeping your driveways clear:
- To keep snowdrifts from reaching the driveways or roads, it’s recommended to install 8 feet fence at a distance of 20-35 times the height of the fence away from your property toward the wind source(opposite to wind).
- Analyze the wind directions & set up the fence perpendicular to the wind direction.
- Plant evergreen trees & shrubs as a permanent fence in a row parallel to the property, roads, or driveways to break up wind flow and snow.
- Keep the driveways 1-2 higher than the remaining ground surface.
- Clear the driveway promptly after snowfall using a snowblower, shovel, or snow plow to prevent snow accumulation and drifting.
- Pile up cleared snow along the edges of your driveway. These snow piles act as physical barriers against the blowing snow.
- Ensure your driveway surface is smooth and level it by filling any holes that can collect snow and contribute to drifts.
- Apply snow-melting products like ice melt or salt to your driveway to prevent snow from sticking.
- Place tall driveway markers along the edges to define boundaries and facilitate locating and clearing the driveway.
- Consider installing snow guards or retention systems on your roof or near the driveway to prevent large amounts of snow from sliding off and drifting onto your driveway.
How to maintain snow fences to last long?
- To help extend the lifespan of snow fences, regardless of whether they are made of wood or plastic, consider the following tips:
- To withstand strong winds and snow pressure, ensure the posts are sturdily installed and the fence securely hooked to the T-posts.
- Position the snow fence in a way that considers prevailing wind patterns and potential snowdrift areas. This strategic placement can optimize its effectiveness and reduce stress on the fence.
- If you have a wood snow fence, apply a protective stain or sealant to help shield it from moisture, UV rays, and other environmental factors. Reapply the coating after regular time intervals as recommended by the manufacturer.
- Perform routine maintenance & checkups to keep the snow fence in good shape & condition. This may include inspecting for any damage or wear, cleaning debris or snow accumulation, and addressing any necessary repairs promptly.
- Clear any snow accumulating on the snow fence to prevent excessive weight and stress.
- Minimize impact or collisions with the snow fence, as this can cause damage or weaken its structure. Keep vehicles, equipment, or other objects away from the fence to prevent unnecessary stress.
Frequently Asked Questions
1: Where can I buy a snow fence?
You can buy a snow fence at local hardware stores, farm supply stores, fence supply companies, building supply centers & online retailers like Amazon or Alibaba.
2: What size T-post for a 4-foot scow fence?
As we’ve to drive at least 2 feet or 1/3 of the T-posts into the ground & the fence should be kept a little above the ground. So we’ll need 7 feet T-posts for a 4 feet fence.
3: Where to place a snow fence?
A snow fence should be placed between the property to be protected & the wind source. According to research, the fence should be placed 20-35 times the fence height away from the property, opposite the wind direction(upwind). The fence should be perpendicular to the wind direction.
4: How far apart should snow fence posts be?
Snow fence posts should be spaced no more than 6-8 feet.
How to attach a wood snow fence to T-posts?
- For attaching wood snow fences to T-posts, use cold-weather cable ties. Zip ties must be long enough to wrap around wood slats and T-posts.
- The fence should be perpendicular to the wind.
- Keep the fence at least 6 inches above the ground to avoid burying under snow.
- Attach the wood snow fence to the T-post’s side facing the wind. It’s better to attach the fence to the flat side of the T-posts.
- A hard metal wire, like 10-12 gauge steel wire, can be used if zip ties aren’t available or if you’re installing a snow fence in a small area. After wrapping the T-post and wood fence slats, twist the metal wire ends with a plier.
Conclusion
You can use zip ties & pieces of metal wires to attach snow fences to T-posts. However, if using the plastic snow fence use wood sticks to sandwich the fence with T-posts. It’ll keep the fence from wear & tear caused by the tension due to heavy wind & sharp metal wires/zip ties used to attach the fence to T-posts.
Install T-posts 8 feet apart from each other and drive ⅓ of them into the ground. Install the fence between the wind source and the property you want to keep safe.
The fence should be installed away from the property 20-35 times the fence height perpendicular to the wind direction.
If you still need assistance, ask us in the comments below.