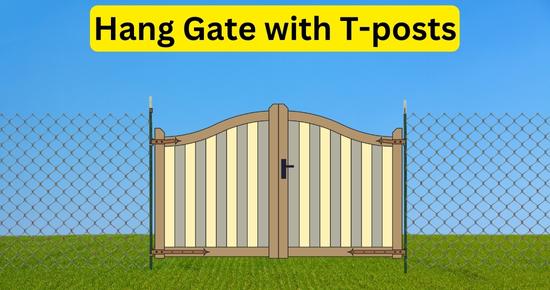
T-post gate hinge pins are most commonly used to hang pipe gates & wood gates on T-posts. It gives a sturdy but temporary fixture & you can remove the gate anytime.
Remember: Using T-post hinges to hang gates is a quick fix but not a permanent solution.
In this post, we’ll share some useful tips & methods to hang pipe gates & wooden gates on t-posts.
How to hang a gate on a T-post?
The method of installing gates along the T-posts is simple using T-post hinges. We’ll slide the T-post hinges over the T-post. The bottom hinge should face upward & the upper hinge should face downward. Lock them at the desired height. Then the gate hinges are hooked to the T-post hinges.
Whether installing a wood gate or metal pipe gate make sure the gate has at least two pre-installed hinges or install them on your own.
If installing a wooden gate with T-posts, attach wooden gate hinges to the gate by drilling screws. Then install t-post hinges on the T-post. At last, hook the wooden gate hinges to the T-post. If you are using a pipe gate mount pipe gate female hinges.
What are T-post hinges?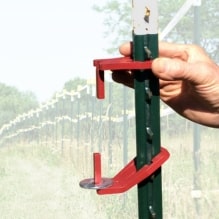
A T-post gate hinge is a bracket/clamp that wraps around the T-post and has a hinge(hook) that is used as the attachment point of the gate. The gate itself has corresponding brackets or hooks that fit on the T-post hinges.
T-post hinges have double T-shaped holes that allow you to install hinges facing upward or downward directions.
For each gate, you’ll need at least two hinges, one is installed at the bottom, and the other at the top. A washer is placed over the t-post hinges(hook) to overcome friction while opening & closing the gate.
Locking pins(nails) are inserted in the empty space between the hinge & the T-post fixes the hinges on the T-post. The T-post hinges available in the market fit all standard T-posts.
Step 1: Measure the gate’s length to install T-posts:
First, we’ll measure the length of the gate using measuring tape plus a couple of hinges for the gate to know how wide to install t-posts. It’ll help you install t-posts at the right distance according to the gate’s length & the whole fixture.
Temporarily vertically align the t-post & place hinges over it. Then attach the gate to the hinges. In this way, you can measure how wide the t-posts should be installed so the gate can be correctly installed.
Measure spots to install t-posts.
Step 2: Install T-posts:
Mark spots to remember where to install T-posts. Manual post drivers are most commonly used to install t-posts. Other than a manual post driver, you can use a similar heavy pipe closed from an end, such as a cast iron pipe, an electric post pounder, tractor bucket.
In case you don’t have a post-driving tool, you can dig post holes using a digging bar, post-hole digger, manual auger, automatic auger drill, or demolition hammer.
Tips:
- It’s better to directly drive t-posts directly instead of digging post holes.
- Drive at least 1/3rd of the T-post to provide sturdy support to your fence.
Step 4: Mount Hinges to Gate
Mostly a metal pipe gate is used to attach the T-posts. For pipe gates, you’ll need a pipe gate hinge. They wrap the metal posts or pipe of the gate & get fastened with bolts using a spanner.
If you are using a wooden gate with a T-post first you’ll have to attach female wood gate hinges. As the T-post hinges are male they have a hook so we’ll need female gate hinges that have hollow openings to hook the T-post male hinges. Wood gate hinges have small holes that allow you to drill screws into the wood. You’ll need wood screws & screw drill to attach the hinges to the wood gate. Hinges can be attached to any side of the gate.
Step 3: Mount hinges to the T-posts:
- After the T-posts are installed according to the gate’s dimensions, it’s time to attach hinges to the T-posts. First of all, align the gate along the T-post at the desired height from the ground. Inspect the location of gate hinges & mark the t-post at the same spots. Now we’ll mount t-post hinges at the same height.
- First, we’ve to install the bottom hinge. Slide the hinge over the t-post with the hook facing upward. Take it down at the desired spot. Then tilt(pull) the hinge & it’ll get stuck to the t-post studs(hook).
- At this moment, hinges are attached to the T-post but they are quite loose and will get off it easily. To prevent hinges from detaching, insert locking pins/screws through the extra spaces between the T-post & hinges.
- At last slide a washer over the hook of the hinge. It’ll protect the gate hinge from degradation.
- Now slide the second hinge(upper) on the t-post with the hook facing downward. Take it at the desired height & tilt it slightly to fix it with the t-post’s stud. Insert a nail through the extra space between the hinge & the T-post to make the hinge fixture tight.
Step 4: Hang the gate with the T-post:
Before hanging gates, make sure the gate has hinges. If the gate doesn’t have pre-welded hinges buy pipe gate hinges and clamp them at the top & bottom.
Steps:
- Place the gate along the t-post with the gate hinges facing the t-post hinges.
- Place a shower on the bottom hinge of the t-posts.
- Then slide the gate’s bottom hinge over the t-post’s bottom hinge(hook).
- Then lift the t-post’s upper hinge & insert its hook in the pipe gate’s upper hinge.
- At last, lock the t-post hinges by inserting nails through the extra space between the t-post hinge & the t-post. The t-post gate will be fixed with the t-post.
- At last tie the other end of the gate to the t-post with a chain.
This way, you’ll have a sturdy pipe gate attached to the t-posts that can be removed at any time.
Remember: The T-shaped hole in the T-post hinges is slightly larger than the T-post’s body, making the hinge & loose. To make the gate & hinge sturdy(immovable), slide nails(locking pins) through the extra space between the hinges & t-post. It’ll fill the extra space between making the fixture sturdy & preventing the hinge & gate from wobbling.
How to build a fence gate?
To hang with T-posts, you can either make a wooden or metal gate on your own. Constructing a T-post gate involves building the gate frame attaching a wire fence to it and then mounting the gate to the T-post.
Here’s a general guide on how to build a T-post gate:
Materials required for making gate:
- Wood bricks or metal bars
- Gate hinges & latches.
- Measuring tape to measure the dimensions.
- Saw or cutting tool to cut the gate frame materials.
- Screws or nails to attach the gate frame material.
- Welding machine if making a metal gate
- Drills to screw nails in the frame if making a wooden gate.
- A level tool to ensure the gate frame is level.
Step-by-step instructions:
Step 1: Measure the dimensions for the gate:
Determine the desired size of the gate and plan the dimensions accordingly. Measure the distance between the two T-posts to determine the width of the gate frame. You can also make a gate with custom dimensions & then install t-posts accordingly.
Step 2: Cut gate frame materials:
Cut the wood bricks or metal bars according to the measured length and width of the gate frame.
Step 3: Assemble the gate frame:
Lay the materials flat on a work surface, aligning the corners to make a rectangular or square shape. Use screws & screw drills to secure the corners of the frame together. If making a metal gate, weld the corners of the frame. Attach a wood or metal bar diagonally to strengthen the gate frame.
Step 4: Attach the wire fence to the frame:
To cover the gate frame, use a sturdy wire fence. After the frame is complete, cut a piece of wire fence equal to the gate frame’s dimension.
If making a wooden gate, use fence staples to attach the wire fence to the gate frame. If making a metal gate, you can simply weld the wire fence to the frame.
Step 5: Attach hinges to the gate:
If making a wooden gate, attach the gate hinges to the vertical side of the gate frame using screws & screw drill/screwdriver.
Make sure the hinges are vertically aligned & securely fastened. If making a metal gate weld the hinges to the gate. Use at least 2 hinges per gate.
Step 6: Install latches(handle):
It’s optional to attach a gate latch to the frame to open & close it with ease. Use screws & drill to attach the latch if making a wooden gate. In the case of a metal gate, weld the latch to the frame.
Step 7: Attach the gate to the T-post:
Once the gate is complete, position the gate frame between the T-posts. Slide the gate hinges over the T-post hinges.
Conclusion
Installing gates along T-posts is easy if you’ve chosen the right hinges for the T-post & the gate. One more important thing is to insert locking pins/screws in the empty space between the hinge & the T-post. If you still have any queries, ask us in the comments below.