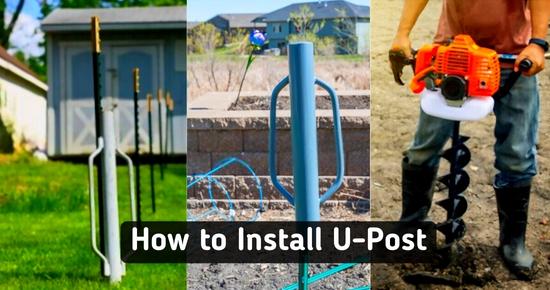
U-posts are U-shaped steel fence posts with an anchor at the bottom that keeps the post fastened in the ground. They are used to install electric fences, wire fences, hang warning signs, support plants & similar lightweight tasks. U-posts are available in 3-12 feet sizes. Choose U-posts at least 2-3 feet higher than your fence height, as a few feet will be driven underground. Installing U-posts is quite easy if you’ve selected the right tools.
Remember: U-posts & T-posts shouldn’t be set in concrete. They are designed to be directly driven into the ground and are removable.
In this post, we’ll discuss some handy tools for installing U-posts.
How to install U-Posts?
- Mark the U-post’s part that has to be driven into the ground.
- According to the desired spacing, mark spots on the ground at regular intervals.
- Align the U-post vertically straight, facing the desired direction.
- A manual post driver is the most handy tool for driving U-posts & T-posts. Besides a manual post driver, you can also use a closed-end heavy metal pipe.
- Electric post-post is also useful for installing a large number of U-posts.
- U-posts are not useful on hard/rocky ground surfaces as driving them can lead to bending, so it’s better to dig post holes. To dig post holes, you can use a drill or auger drill or demolition hammer. Place the post in, fill the hole again, and press the soil with a hand compactor.
Cautions:
- U-posts are not ideal for hard ground as they can bend.
- Some people may also say you can install U-posts with a mallet, but it’s not useful except if the ground is quite soft. There are always chances of slipping & hitting with hands.
Basic rules to know while driving metal posts:
There are certain basic rules you should keep in mind while installing T-posts & U-posts:
- How deep to drive U-posts?
For sturdy fencing, it’s recommended to install 1/3rd of metal posts under the ground. However, U-posts are not that hard & forcefully driving them may result in sending. So you can install 1/4th to 1/3rd part of U-posts into the ground. For example, At least 2 feet of an 8-foot U-post should go underground. It’ll be helpful if you mark the part of the T-post that should be driven into the ground.
- Fence post spacing:
A general rule is to install U-posts & T-posts a maximum of 8 to 12 feet apart. However, for lightweight fences, you can increase the distance between fence posts & vice versa. According to the desired spacing, mark spots on the ground.
- Time:
The hardness of the ground & type of tool decides how much time & energy will be required. If the soil is moist, driving U-posts will take less than a minute & quite less power. However, if the ground is rock hard, driving U posts will take more time & energy.
Below, we’ve discussed each step in detail:
Method 1: Drive T-posts with a Sledgehammer:
A large head sledgehammer can be used to drive U-posts, but only on soft ground. It’s the most handy tool to drive U-posts. Although using a sledgehammer is not a safe & recommended practice for driving metal posts, it should be only used to drive U-posts on soft ground. On soft ground you don’t have to hit the hammer very hard in order to drive posts; hence, there are very low chances of injury.
Method 2: Install U-posts with a manual post driver:
A post-pounder or drive is the most useful manual tool to drive U-posts & T-posts without digging. It’s made of cylindrical pipe that weighs around 8-10kg.
- Mark the spots to install U-posts. Ensure there are no underground wires at the spot, as they could be destroyed.
- Vertically align the u post with the spike end toward the earth. Place the post-pounder over the U-post.
- Now push the post driver upward and pull it down with maximum force. Repeat all the steps.
- U-post will start driving into the ground due to the weight of the post-pounder.
Note: Keep the post straight while driving; otherwise, it’ll be installed inclining.

Besides a manual post diver, you can use several tools & techniques, such as a heavy metal pipe closed from one end i.e. cast iron pipe, or an electric or gas post pounder.
Below, we’ll discuss all methods of installing U-posts without a post driver.
Method 3: Install U-posts with a heavy metal Pipe/tube:
You can use any heavy metal pipe closed from one end and wider than the U-post diameter. It’ll work the same as a manual post driver.
- Align the U-post straight.
- Place the pipe over the U-post and start pounding it up & down.
- Use a level tool to check if the post is straight.
- If the post is leaning, forcefully pull/push it in the right direction.
This method/tool requires a lot of time & energy, thus helpful in soft ground & installing fewer U-posts.
Method 4: Drive U-posts with an electric post pounder: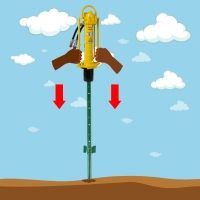
A gas or electric post-pounder is a powerful tool that takes minimum time & energy to install U-posts. A post-pounder is ideal for fencing over a large area or if the ground is extremely hard.
It is an expensive tool, so you can rent it for a day.
Steps:
- Ask someone to hold the U-post straight.
- Place the post-pounder over the U-post.
- Turn on the electric post-pounder.
- Slightly keep pulling the pounder downward.
- U-post will be driven in less than a minute.
Method 5: Dig post holes to install U-posts: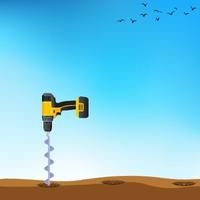
Although you can dig post holes for installing U-posts, but it’s not recommended especially using manual post-hole digging tools. Manual post-hole digging tools are designed to dig large post holes for heavy wood & metal posts. We dig post holes when the post has to be set in concrete. As U-posts are 2-3 inches wide, Installing them by digging holes without concrete will make the fence loosely anchored in the ground.
However, in hard ground, digging post holes can help you to verify if there is a rock layer underneath that can hinder the path of posts & result in bending. Hence, you can use a masonry drill or auger drill bit according to the U-post’s diameter.
Dig post hole with auger drill:
According to the required hole size and the diameter of your U-posts, make sure to use a maximum of 2-3 inch diameter auger drill bit long.
Using an auger drill is quite simple.
- Mount the auger/masonry bit to the drill & place it on the desired spot.
- Turn on the auger & keep pressing it downward.
- A post hole will be drilled in 1-2 minutes.
- Now, insert the U-post in the hole with the anchor facing downward.
- Fill the hole with soil & compress it using a hand compactor or any heavy object.
Dig post hole with digging bar:
This method should only be used when you don’t have a post-driving or digging tool & for installing a few posts. Although this method is the cheapest, it takes quite more time(at least 5 min per post) & energy than any other tool.
Steps:
- Start hitting the sharp end of the digging bar on the ground.
- After each hit, move the bar left/right, back/forth.
- Sand layers will be penetrated and move aside, making the hole deeper.
- Repeat the same step until the post is 2-3 feet deep.
- After digging post holes, place the U-post straight in.
- Then, pound the posts a few times with a hammer.
- Cover the hole with soil.
- Press the soil with your shoes or a hand compactor.
Note: You can also install t-posts using all the tools mentioned above.
How to attach fences with U posts?
Posts clips, also known as T-post clips, are widely used to attach wire fences to U-post. As an alternative, heavy-duty zip ties or pieces of metal wires can also be used to attach wire fences(i.e., garden fences) with U-posts.
- Buy sturdy fence post clips from the market or online.
- Wrap the post clip around the U-post & fix it in the U-post’s hooks(studs).
- Fix the closest fence wire in both hooks of fence clips.
- Twist(bend) the clip’s hook around the fence wire using a plier or clip bender.
Note: At regular intervals of 1-1.5 feet, attach fence wire to U-posts. So you’ll need 3-5 fence clips or other attachment material on each post.
Similarly, if you are installing electric fence wires on U-posts, you’ll need U-post insulators. They are made of plastic, wrap around the U-post & keep the electric fence wires insulated from the metal posts. You’ll need a U-post insulator equal to the number of strands on each post.
Conclusion
Installing a U-post is quite easy if you’ve chosen the right tools. You should at least have a manual post driver(hammer); it’s inexpensive & highly useful for driving metal posts. As an alternative, you can also use a similar metal pipe.
You can also use advanced tools such as gas/electric post-pounders. However, if no post-driving tools are unavailable, you can also dig holes.
If you still need any assistance, ask us in the comments below.
How do you remove a u-post? A t-post puller doesn’t seem to work because there’s nothing to latch onto.
You raised a good point.
You can use a pipe wrench along a car jack/farm jack. Lock the wrench around the U-post few inches above the ground. Adjust the farm/car jack under the wrench & lift it up by pressing the handle.
However U-posts having studs(hooks) are also available in the market.
Your content always manages to captivate and educate me. Keep up the fantastic work!
Thank you for appreciation.
This post hits close to home for me and I am grateful for your insight and understanding on this topic Keep doing what you do
Your blog has become my go-to source for inspiration and motivation I am so grateful for the valuable content you provide
Thank you.