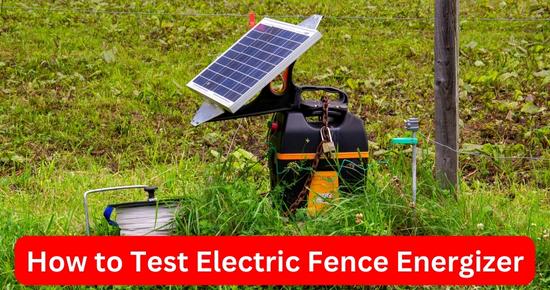
A fence charger or energizer is the heart of your electric fence system. Fence energizers are designed for different purposes and ranges, so you must check your fence charger after a time interval or when you are facing some issues with your fence voltage.
How does an Electric Fence Energizer work?
A fence energizer is designed to output very low amperage to protect living beings from serious dangers. A fence charger works the same as an automotive ignition system. When current enters the fence energizer coil, it generates a magnetic field in the coil loop.
An induced emf(electromagnetic force) is generated due to the phenomena of electromagnetic induction that is relatively higher, such as 5KV to 12KV.
When fence energizers are continuously exposed to moisture and rain, they can rust, ultimately resulting in bad results.
You can save your electric fence box by installing it under a cover on a wall away from flammable materials, where children and animals can’t approach it.
Inspect the wiring and circuits to identify a broken or loose connection. Use a rust cleaner to thoroughly clean your fence charger.
In this informative post, we’ll discuss how to test an electric fence energizer with easily available tools.
How to test an electric fence energizer?
A multimeter, electric fence tester, or screwdriver is commonly used to test an electric fence energizer.
To check your fence charger:
- Disconnect wires from the energizer terminals.
- Set your multimeter knob(dial) to the AC voltage symbol (V〜). Turn on the electric fence energizer. Attach the multimeter probes to the fence charger terminals. A fine fence energizer should output 5-15kV.
- Also, measure the amperage of the fence energizer. An electric fence energizer should output very low amperage such as 0-500 milliamps. Voltage and amperage can vary according to different manufacturers and settings.
- Take a screwdriver and attach its metal part to both terminals of the fence energizer. You’ll see a loud sparking (clicking) sound with each voltage pulse.
- Take your electric fence tester. Attach the metal pin at the head of the tester to the live terminal of the fence energizer. Attach the black probe to the ground terminal. The tester will show a voltage reading that should be above 5kv.
Below we’ll discuss all steps to test the electric fence energizer in detail.
Tip: If your electric fence energizer is OK, you will see a clicking sound, and light glows with each clicking sound. When the voltage drops too much(fault), the light won’t glow.
Step 1: Safety Measures:
Wear insulated gloves and shoes before testing an electric fence energizer. A fence charger usually inputs 120 or 240 V AC power supply and outputs a high voltage (5-10KV), which could be unpleasant.
Step 2: Test the Electric fence Charger with a Screwdriver:
Turn on the electric fence charger. Attach the screwdriver’s metal part with the fence charger’s ground terminal and take it near the live terminal.
Without a tester, you can use a screwdriver to test if the fence charger is generating a voltage pulse(wave).
When the energizer produces a current pulse, you’ll see a spark jumping from the live terminal of the fence charger to the screwdriver.
The spark is produced due to high voltage, so the fence charger generates a current pulse and is fine.
Tool 3: Test with an Electric Fence tester:
A fence detector measures the voltage produced by the electric fence energizer.
- The fence tester has a metal pin at the head that goes to the energizer’s live terminal.
- Connect the needle at the end of the black wire to the ground terminal.
- The tester will show you the output voltage of the fence energizer in kilovolts, such as 7.2KV.
- Suppose the tester reads 500-2000 or more volts drops than the adjusted setting(ideal). In that case, the fence energizer(charger) is faulty because the voltage supply is not sufficient.
All these methods are used to test whether the electric fence charger is OK. But if there is an issue, you must open the electric fence box and inspect for any external damage.
Step 4: Test the electric fence energizer output voltage: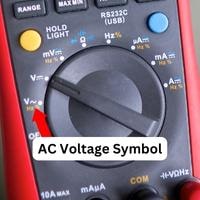
It’s generally not recommended to use multimeters to test electric fences because they are meant for steady power supplies. Electric fences send out quick jolts of up to 10,000 volts, which can damage the multimeter. However, if a multimeter is all you have and you’re okay with the risk, you can still get a rough idea if the energizer is working, though the results won’t be very accurate due to the pulsing power.
- Take your multimeter & set it to AC voltage(V〜) at a higher range in order to test the energizer;s output voltage.
- Insert the red probe in the VmAΩ port and the black probe in the COM port.
- Connect the red probe to the live terminal in the fence energizer, usually marked with an electric sign(🗲), which is connected to the electric fence wires.
- Connect the black probe to the ground terminal, usually marked with the grounding sign.
- If your fence energizer works fine, the multimeter will show the ideal voltage, between 5-12KV.
Step 5: Test amperage of the fence charger: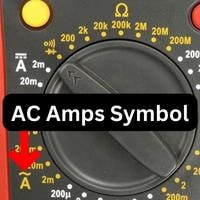
In the same way, we’ll also test the amps generated by the fence energizer.
- Set your multimeter to AC amps sign “A〜” in the milliamps range. Connect both probes as previously black to ground and red to fence terminal(live).
- An electric fence should output very low amperage because as we increase amperage(number of electrons/charge), the current becomes more effective.
- According to research, electric fence amperage between 0-500 milliamps is safe for humans and animals.
- If the amperage increases up to 1 amp or above, your electric fence can be fatal. High voltage only affects once the amperage is kept low.
How to test a solar fence charger?
A solar fence charger has a battery that stores the energy converted by the solar plates.
Unscrew the plate on your solar energizer to reach the battery. Unplug the wires from the battery & fully recharge it.
Use a digital electric tester to check the voltage of the battery used with the fence charger. If your fence battery is 12V, it should read around 12-12.6V. If the battery voltage drops too low, either there is a fault in the fence charger, solar panel, or the battery.
Attach your fence energizer battery wires to another battery. Turn on the energizer if you hear clicking after connecting a new battery. Your previous battery was faulty, affecting your energizer performance.
A solar or DC(battery-based) fence charger works like a vehicle ignition coil by converting low solar or battery voltage into a high voltage pulse that gives a little electric shock.
If your electric fence charger is fine, there could be an inadequate or improper ground connection, or the fence wires are shorted.
Inspect your fence charger for corrosion or dust. Use a corrosion spray such as WD-40 to clean the rusted terminals for better contact points.
Frequently Asked Questions
Why is your electric fence clicking but not working?
If your electric fence is clicking but not working, you must check the output voltage of the fence charger. Disconnect all wires from the fence charger, turn it on, and measure the voltage at the fence charger terminals using a multimeter.
If the fence charger outputs a sufficient voltage(5k-12KV), then there is an issue with the fence wiring. The fence charger is faulty if the voltmeter reads low voltage in the charger terminals.
How to test an electric fence without a tester?
Without a tester, you can check if an electric fence is working by using a piece of grass, a screwdriver, a tester screwdriver, a non-contact voltage tester, a compass, a tube light & a light socket.
How to connect an electric fence to an energizer?
Your electric fence charger has two output terminals: ground(return) and hot(live). The ground terminal is attached to the fence rod with a wire. The live fence terminal on the charger is marked with an electric sign(🗲-↯) and is connected to the live fence wires.
Use galvanized wires, rods, and clamps to wire an electric fence. Galvanized wires and metals are processed with a layer of zinc that protects your fence from rusting and degrading.
Conclusion
Your electric fence is the controller(brain) of your electric fence. A minor fault in the fence charge can result in its poor performance. If your fence charger is unsatisfactory, it’ll result in abnormal voltage and amperage.
You can test your fence charger at home following the step-by-step guide above.
If you still have any queries, ask us in the comments below.