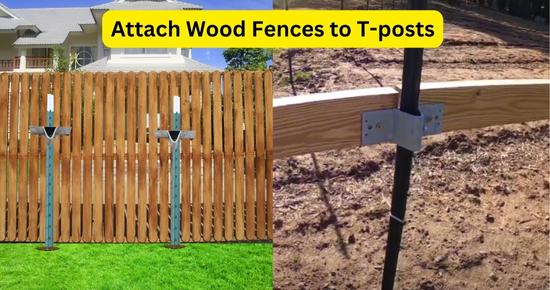
T-posts are widely used to support fences as a cost-effective & time-saving alternative to wooden fence posts. However, they lack the necessary structure to directly attach wooden panels or boards. The good news is that T-post adapters & brackets are available in the market: specially designed fencing hardware to attach wooden fences to metal T-posts.
However, remember that T-posts are flexible & are prone to shifting or leaning due to the heavy load, tension & ground softness. That’s why they are not ideal for heavy-duty & large-area wood fences.
To attach a wood fence to T-posts, follow the step-by-step guide below:
How to build/attach a wood fence with T-posts?
Whether you want to attach wood panels or a privacy fence to T-posts, a T-post adapter is what you’ll need.
- Start by driving T-posts at 6-8 feet intervals.
- If building wood board fences, you can attach either a or two at the same T-posts adapter. At corners, you can use a T-post corner adapter (90% braces).
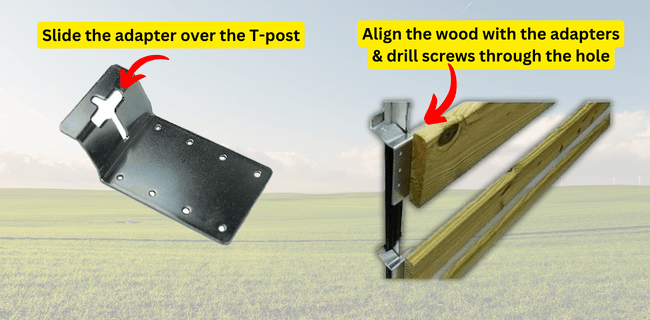
- Slide the adapters over T-posts & fix them at the desired height.
- Then attach the wood boards to T-post adapters by drilling screws through the holes.
- For wood panel fences i.e. privacy fences, attach the T-post adapters to any horizontal or vertical panel.
Below, we’ve discussed each step in detail.
Materials Required
Except for T-posts and wood fence panels, you’ll need:
- T-post adapters/brackets or similar attachment tool
- Screw drill & screws
- Nails & hammer(optional)
Always use appropriate-sized galvanized screws & T-post adapters as they are resistant to rusting or weakening the attachment over time.
Check out what are T-post adapters & how they makes it comparatively easier to install wood fencing with T-posts.
How do T-post adapters work?
T-post wood adapters/brackets allow you to attach wood boards or panels to T-posts for DIY wood fencing projects. T-post adapters help in joining wood panels to T-posts. Additionally, you can attach two panels at the same adapter and makes it easier to replace or repair damaged wooden fence panels since you can easily detach and reattach them anytime.
How to use:
- T-post adapters have T-shaped openings to slide(mount) them over the T-posts.
- Then a bolt on the adapter is screwed to tightly grip the T-post & prevent any movement. However, some design comes without bolts.
- The rectangular metal plate of the adapter has holes that allows you to attach wooden panels. This is often done using wood screws(and screw gun) or nails.
Tips to buy T-post adapter:
- Ensure that the T-post adapters are suitable for the size of wood panels you plan to use.
- If you are using different-sized wood panels choose adapters accordingly.
- If you’ve installed wood posts between the T-posts for stability, you’ll need an adapter to attach wood panels to wood posts.
T-post adapter sizes:
T-post adapters are commonly available for 2×4 in and 2×6 in wood panel sizes. These are the standard dimensions of wooden rails used in many fence designs.
On each T-post you’ll need adapters equal to the number of fence panels(strands).
Price:
T-post adapters cost around 3-4$ per piece. They come in various shapes and adjustable designs to accommodate various T-post sizes & allow you to attach the wood panels(rails) vertically or horizontally.
Other DIY alternatives to T-post Adapters:
You can also use pipe straps, U-bolts, saddle clamps, and pipe brackets other than T-post adapters to attach a T-post to a wooden fence or panels. Just make sure the tool you pick is big enough to go around the T-post and fits over its studs securely.
How I used U-bolts to attach wood fence panels to T-posts?
A couple of years ago, I used U-bolts to attach wooden fence panels to T-posts for my goat’s fence perimeter. They’re quite cost-effective, usually around $2 each, which is cheaper than T-post adapters and many other tools.
Here’s a step-by-step guide based on my experience for you:
- Get U-bolts that are wide enough to go around T-posts, and make sure the two threaded arms (or legs) are long enough to pass through the wood panels after drilling holes.
- Align the wood panels on the opposite side to the T-post studs. Take the U-bolts, wrap them around the T-post, and touch the ends of the U-bolt’s arms to the wood panel. Mark the exact spots. To mark the exact spots, I dipped the U-bolt’s legs into ink.
- Drill holes through the marked spots using an appropriate wood drill bit that matches the diameter of the U-bolt’s legs. If the hole is too small, the U-bolt won’t pass through the wood; if it’s too large, the U-bolt won’t stay in place and will come .
- After drilling holes, align the wood panels at the installation spot on the opposite side of the T-post studs. Take the U-bolts, wrap them around the T-post, and pass their legs through the holes in the wood panels.
- Make sure that the U-bolts comes over the T-post stud as it will prevent them from sliding down and ultimately keeping the whole wood structure in place. On the other side of the wood panels, secure the U-bolts tightly using nuts of the same size. Atlast, for safety cover the ends of U-bolt’s legs with bolt covers/caps.
In the same way you can use other tools like pipe straps to attach wood fence or panels to T-posts
Step 1: Decide the area & layout of the fence
By measuring the area to be fenced, it’ll be easy to decide how much fencing material is required. You can use a measuring tape, measuring wheel or GPS to measure the length of the area. After that, drive rebar or temporary posts at the corners of the area to remember the shape & layout of the fence.
Step 2: Drive T-posts:
After deciding on the area to be covered, now we’ve to drive T-posts. Make sure to space the T-posts such that a T-post is present where a wood panels ends, or cut the panels in the length accordingly. For large area coverage, permanent fencing or to make the fence more robust it’s recommended to incorporate wood posts at the corners and in between the T-posts use wood posts at corners.
Tip: Make sure to drive as much part of T-posts as possible for better strength & stability in the fence.
Remember three things while installing T-posts:
- T-post spacing:
T-posts are spaced depending on the weight of the fence, the softness of the ground & the expected load of animals. For wood/board fences, T-posts can be spaced a maximum of 6-8 feet.
Note: You’ll need wood panels equal to the spacing between T-posts.
- How deep to drive T-posts?
For greater strength 1/3rd of the fence posts length is driven into the ground. For better stability in heavy fences like wood panel fences, it’s recommended to drive ⅓rd of the T-posts.
- Incorporate wood posts:
Consider adding wood posts at corners & after every 4-5 T-posts(optional) for greater strength in the fence. However keep in mind that wood posts usually get installed in concrete, so you’ll have to dig post hole and set the posts in concrete.
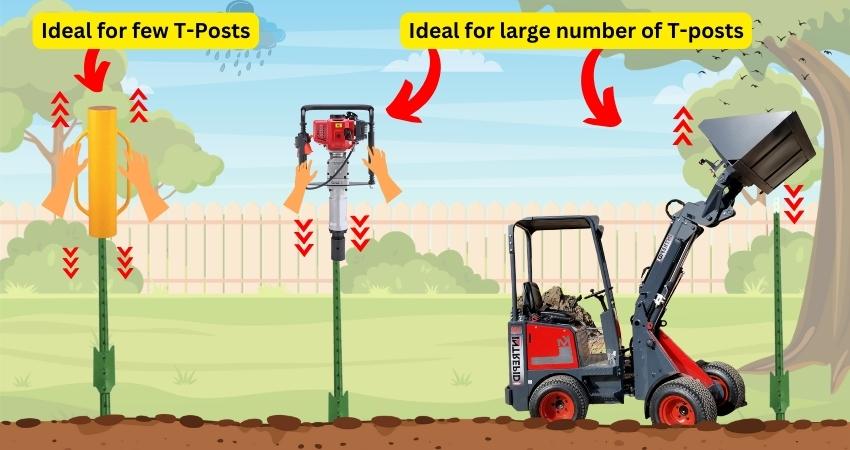
Tools for installing T-posts:
The following tools can be used to drive T-posts:
- A manual post driver takes a maximum of 2-5 minutes to drive a T-post, depending on ground hardness. As a DIY alternative, you can also use a heavy metal pipe such as a cast iron pipe to drive a few T-posts.
- An automatic/gas-powered post driver takes very little effort & 1-2 minutes per T-post.
- Or if you’ve got a tractor or loader equipped with a bucket, it can be used for driving a large number of posts quite easily.
Step 3: Mount T-post Adapter
- Unscrew the bolt on the T-post adapter.
- Slide the adapter over the T-post & take it to the desired height.
- To fasten the adapter, screw the bolt again.
Step 4: Attach the wood fence to the T-posts
- Now, place the wood boards horizontally between the T-posts adapters at the two T-posts. Mark these spots & pre-drill small holes through the wood boards to prevent them from splitting.
- Now place the board again between the T-post adapters. Drill screws through the holes. In this way, attach two wood panels at each T-post adapter.
- Make sure that the wood boards are aligned properly according to the design of the T-post adapters.
- Continue positioning, aligning, and attaching the wood boards to each T-post adapter along the fence line until the entire fence is complete.
Step 5: Install a gate between the fence (Optional)
To install gates you’ll have to measure the length of the gate & drive the gate posts accordingly. For greater strength & hanging heavy gates, it’s recommended to use wooden posts as gate posts. However, if you want to hang a gate with T-posts you’ll need T-post hinges.
Simply slide the T-post hinges over the T-posts & fix them over the desired height. Then the T-post hinge is hooked with the hinges on the gates.
Step 6: Test stability
Once all the wood boards are attached, ensure that the fence is sturdily attached at every point by slightly shaking the structure. Make any necessary adjustments or tighten screws if needed.
Additional wood fencing tips:
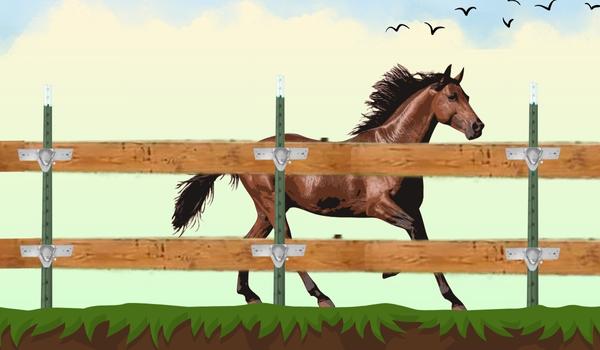
- If you’ve installed wood panel fence, to keep animals from entering the fenced perimeter, attach chicken wire or a suitable wire fence to the wood boards as a barrier.
- If you’ve to keep livestock inside the wood fence they’ll push against it and ultimately makes it weak and results in leaning. To prevent the animals from rubbing/pushing against the fence you can install electric fence wires inside the wood fence, especially in between the panels to keep them from escaping.
Frequently Asked Questions
What should be the T-posts spacing for wood fences?
As wood fences are heavier, T-posts should be spaced a maximum of 6-8 feet. However, T-posts should be driven as much as possible (1/3rd recommended) for better strength.
Can you attach a wood fence to the T-post and metal posts?
Yes, we can attach wood fence panels/boards or privacy fences to T-posts using T-post adapters. T-post adapters come in various designs & sizes to accommodate different thicknesses of T-posts & to attach the wood panels vertically or horizontally. Similarly, steel-to-wood fence brackets are used to attach wood fences to round metal posts.
Can you attach a wood gate to T-post and metal posts?
To attach wood gates to metal posts, metal post hinges are used, such as T-post hinges are used to attach gates to T-posts. The male hinges get mounted on metal posts. Similarly, female hinges get attached to the wooden gates by drilling screws through the holes. Then the hinges on the gate & the posts are hooked to each other.
Conclusion
T-posts provide a sturdy & cost-effective replacement for heavy wood posts. You can use T-posts to install lightweight to normal wood fences. However, due to heavy weight & ground softness, T-posts can shift/bend with time. As per my experience, the T-posts adapter is quite sturdy & efficient to make a sturdy joint. They also allow you to easily remove fence posts by removing screws.
If you still have any queries, ask us in the comments.
Super interesting, thank you for the info and ideas!!
Thanks dear. I hope it’ll work for you. If you still need guidance feel free to ask.
We are putting up a 4 foot picket fence for decorative purposes and want to use T-posts. Can you tell me more about the brackets and T-posts adapters? What do they look like, where do you get them? And what do you use for the corner – exact name on all please. I have called every store around that sells T-posts and no one knows what these are. The Amazon link you have in the article takes me to a horizontal t post bracket – that’s not the same as the photo shown at the beginning of your article. We are at a loss on how to do this so any help is appreciated! Thanks much!
You can get the exact T-post adapters at: https://www.afence.com/t-post-line-wood-adp.html
For corners you can use the wood to steel post corner adpaters (90 degree): https://amzn.to/4dU15DB