Sometimes it gets necessary to electrify your wire fence, such as in order to keep someone from accessing the fence around your property, keep your pets i.e. dogs from digging, and livestock from damaging the parameter wire fences or to keep the predators like beers to stay away from the wire fence. It is not possible to directly electrify any type of wire fence as it touches the ground and metal posts. Directly electrifying a wire fence will short it out & most of the current will drain into the soil.
The right way to electrify a wire fence is to install electric fence wires around(close) the fence, keeping them insulated from each other in order to avoid short circuits and power loss.
For this purpose, the convenient way is to install electric fence wires on the same posts using fence post insulators. Or you can install fence posts for electric fence wires at some distance from the wire fence posts.
In this post, we’ll discuss how to install electric fence wires with a wire fence or chain link fence.
How to electrify a wire fence?
- Measure the area that needs to be covered.
- Determine the number of electrified strands you want to put around the wire fence.
- Choose a fence charger that can easily power the entire area.
- As the most important point is to keep both fences(electric & wire fence) insulated from each other. Install extended fence post insulators on the existing wire fence posts or install new posts at a little distance for electric fence wires.
- Decide on series or parallel wiring & install fence wires.
- To install gate terminate fence wires at both gate posts. You can either make an electrified gate using electric fence gate handles or you can install a non-electric metal gate.
- Install ground rods & connect them together.
- Connect the fence charger to fence strands & ground rods.
- Make sure that the electric fence wires are not touching the wire fence, posts, or anything else.
- At last test the electric fence using a fence tester.
Follow the complete step-by-step guide below.
Material Required:
- Measuring tape or any length measuring tool
- Electric fence wire
- Fence post insulators
- Electric fence energizer
- Ground rods & clamps
- Highly conductive, insulated wire to connect ground rods & energizer to the rods & fence.
Step 1: Measure the area to be covered
First, we’ve to measure the length of the area that has to be covered. It’ll help you know how much electric fence wire will be required & which fence charger would be ideal to cover that area.
- A tape measure is commonly used to measure the length of the enclosure & I have used it tool for a long time.
- A measuring wheel is also used to measure large perimeters i.e. field fences & commercial projects.
Tip: GSP might not measure the distance accurately but you can get a general idea.
Step 2: Decide the number of strands
After you’ve measured the perimeter of the enclosure. Decide how many strands of electric fence you want to install around your wire fence. It’ll help you estimate the length of wire required & choose the right energizer accordingly.
The number of strands depends on your purpose of electrifying the wire fence:
- If you intend to keep intruders from climbing over the fence install electric wires at regular intervals, especially at the top.
- If your concern is to keep dogs from digging holes under the wire fence, install a live wire a few inches above the ground.
- You can also install an electric fence wire at the top of the wire fence to prevent animals & intruders from climbing.
- To keep animals from pushing against the fence install a couple of live fence wires at regular intervals.
Step 3: Calculate the total wire required:
Decide the number of strands & multiply it by the length of the enclosure to be covered and you’ll get an idea of how much total fence wire will be required. However, get some wire extra for safety.
For example: If the total length of the area is 800 meters and you want to install 3 strands. The total wire required will be 2400 meters.
Tip: You must have some spare wire to connect the ground rods & the energizer to the ground & fence wire.
Choose the right wire:
Poly wires & ropes are lightweight, cheap, easy to install, & tighten. Metal wires are durable, but they are heavy & more prone to get loose & short-circuit.
For temporary or light electric fencing requirements, a poly wire/rope or tape is perfect. However, for slightly heavy-duty fencing requirements a metal wire is preferable.
Step 4: Choose suitable post insulators
The most important step is to choose the right extended(long) fence insulators. These post insulators extend 3-6 inches from the post, hence ideal to keep electric fence wires insulated from the wire fence.
Choose extended post insulators according to post type:
- Metal posts Insulators:
You can choose extended post insulators according to the type of post & shape. They are available for T-post, U-posts, round metal posts & wood posts, in different lengths.
- Wood posts Insulator:
For wood posts, you should buy ring insulators. They are 10 inches long & extend the live strands 7 inches from the post.
- Chain link fence insulators:
Chain link insulators get attached to the wire fence & extend the electric fence wires 5 inches from the wire fence. They help install electric fence wire on the existing wire fence setup & also keep both fences insulated.
Chain link fence insulators can be mounted anywhere on two parallel wires of the wire fence or chain link fence. To install chain link insulators open the legs wide(claw) and clip them over the wire fence.
Tips:
Make sure to install post insulators equal to the number of strands on each fence post & at the exact height.
To keep electric fence wires tight & prevent them from shorting out with the wire fence, install insulators at less distance than average (i.e., 5 feet).
Step 5: Choose a suitable fence energizer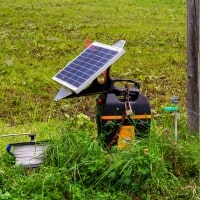
Whether you already have a fence energizer or have to buy one, it’s crucial to choose one that can easily fulfil your needs. Here are a few factors to consider while choosing a fence charger.
Checkout distance ratings of energizers:
Regardless of how many strands you install in the fence, you can choose an energizer according to one output joule per mile.
According to manufacturers, their energizer can cover 8-20 miles of wire per joule. However, these results are obtained in ideal conditions.
In practical terms (on-field), a fence charger can cover approximately five miles of wire per joule, due to vegetation and minor power loss.
The distance rating on the energizers refers to a single-wire fence. To find out if an energizer is suitable for your application, divide the distance rating of the energizer by the total number of strands.
Compare it with the total length of your fence enclosure so you’ll know if the energizer is capable of covering your desired area.
Power supply options available
There are three types of fence chargers: DC, AC, and solar.
- AC fence chargers are the most powerful as they receive constant power from the home supply. You don’t have to install batteries or recharge them, nor wait for the sun to come out for the solar energizer to work.
- DC Energizers: Using a DC fence charger is ideal for portable fences and when there is no power nearby. However, you’ll have to continuously recharge the battery.
- Solar Energizers: If you’re installing a fence far from home without having a power source, solar energizers can be useful eliminating the need for recharge. However, they are not suitable for heavy-duty & long-term use. They automatically recharge batteries with sunlight & prevent you from hassle.
Step 6: Install electric fence wires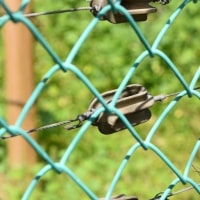
After installing post insulators, it’s time to install electric fence wires around the enclosure.
First of all, tie off the fence wire at the corner post. Then you can install fence wires in series or parallel.
Series Fence Wiring
In series wiring, we install all fence strands continuing the same wire. Series wiring is helpful in covering small areas as it’s easy to install & remove back. In a short area, a single wire path is enough to deliver current in the whole fence.
However, due to a single current path, a breakage in the fence wire will stop the current to flow in the rest of the wires. Also due to a single path resistance will increase, and current takes more time to travel the entire fence hence not ideal to cover a larger fence.
When installing an electric fence around the wire fence or a chain link at your home or garden I’d recommend you install series fence wiring.
Parallel Fence wiring:
If you’re installing an electric fence over a large area you should install fence wiring in parallel. In parallel fence wiring, all fence strands are separately installed & then interconnected at multiple points to decrease the resistance & improve current conductivity in the fence.
If there is a breakage in a fence wires current will still flow in the entire fence due to the multiple paths available.
Step 7: Terminate(End) the fence wires:
After all the fence strands are installed, terminate them at the corner posts. Fence wires usually start & end at the same post. To install electric fence gates, terminate the fence wires at both ends of the gateway.
There’s no hard & fast rule to end an electric fence. Simply pass the wire’s end through/around the corner post insulator& knot it back to the fence wires.
It’s easy to end poly wires as compared to metal wires. Polywires can be ended by installing normal fence post insulators. However, to end hard metal fence wires, you’ll have to install end/corner post insulators.
Step 8: Install electric fence gates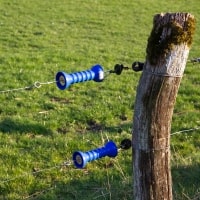
If you’ve installed a gate between your wire fence, you will have to install electric fence gates at the same location.
Steps:
- To install electric fence gates, terminate the fence wires on posts at both ends of the gateway.
- Then take a wire equal to the length of the gate & attach its one end to the electric fence gate handle.
- Tie the other end of the wire to the terminated wire at one end of the gate.
- Then hang the gate handle’s hook on the terminated wire at the other end of the gateway.
- In this way install electric fence gate handles equal to the number of strands.
- Make sure that the handle gate wires are tight & not touching the ground.
If there is heavy grass, you must cut it to prevent power loss from your fence.
To ensure better current conductivity throughout the whole fence you can connect fence strands at both ends of the gate with an insulated wire installed underground. However, a short area fence will work fine without this.
After the fence wiring is complete, it’s time to install electric fence grounding.
Step 9: Install electric fence Grounding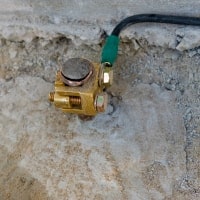
Grounding is the most crucial part of an electric fence. Grounding completes the fence circuit & takes the current back to the energizer improving your fence power.
The more current reach back to the energizer will increase its power.
Install ground rods:
Things required:
- At least 3 ground rods(3 feet per joule output).
- Galvanized ground rod clamps
- High quality conductive & insulated wires
Tips for proper electric fence grounding:
- Choose high-quality copper or galvanized steel ground rods & clamps.
- As per recommendation, you should install at least 3 feet of ground rods per joule output of the fence charger. However, if the ground is dry or rocky, install more ground rods than recommended. Drive them as deep as possible as the moisture increases deep in the ground & more charges can travel to the ground rods. Ideally, each ground rod should be at least 6-8 feet long.
- Install ground rods using a hammer or a manual post driver.
- Install ground rods along the fence line within 2-3 feet.
- Start installing ground rods at the start of the fence near the energizer & space them 10 feet apart from each other.
- Install a minimum of 3 ground rods.
- Use a hammer or post driver to drive ground rods.
- Leave a few inches out of the ground.
After installing ground rods:
Connect ground rods:
- Unscrew the ground rod clamps & slide them over the rods.
- Use at least the same quality wire as used in the fence wire or higher(recommended) tp connect ground rods.
- Pass the wire through the clamps & tighten the screw.
- Similarly, connect the first ground rod to the second & the second to the third & so on.
- In this way, connect all ground rods using insulated wires. Make sure no wire touches the ground.
Remember: Ideally ground wire must be insulated to prevent short circuit & power loss. However, if you’re using bare wires, keep them tight so they don’t touch the ground.
Step 10: Setup the electric fence charger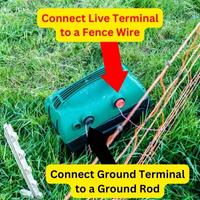
After installing the electric fence grounding, we just have to attach the energizer to the fence wires & ground rods.
Connect the energizer’s live terminal to a fence wire:
- Take a highly conductive insulated wire same as used for connecting ground rods. It must be long enough to reach from the energizer’s live terminal to the fence wire. Make sure the energizer is off. Unscrew the live terminal of the energizer.
- Wind the wire’s end around the terminal at least 2-3 times & screw the bolt again.
- Knot the other end of the wire to the fence wires. This wire will take current from the energizer’s live terminal to the live fence strands.
Connect the energizer’s ground terminal to the ground rod:
- Similarly, take another wire long enough to connect the energizer’s ground terminal to the ground rods.
- Unscrew the ground terminal. Wind the wire 2-3 times around the ground terminal & tighten the terminal again.
- Similarly, attach the other end of the wire to the nearest ground. Unscrew the ground rod clamp insert the wire & screw the clamp again.
Tip:
- Use high-quality wires to connect the energizer to the fence & ground rods.
- After the electric fence wiring is complete, ensure the fence strands are not touching the wire fence or anything else that could drain power from the fence.
Test the electric fence
At last, turn on the energizer and test it to see if there is a steady high voltage as mentioned on the energizer.
Steps:
- Take a fence tester & turn it on.
- Pinch the metal pin of the black probe in the soil.
- Attach the metal part(hook) of the tester to the fence wire. Some of the tester don’t have a probe & you just have to attach the tester to the fence wire.
- Most electric fence energizers output 5000-8000 volts(5-8KV). Compare the tester reading with the voltage range claimed by the company. If the voltage in the fence is very low, it simply means there is a short circuit.
If there is quite low voltage, electric fence wires are shorted out, and power leaks. It also could be due to insufficient ground rods or a low-power fence charger.
Conclusion
Remember directly electrifying a chain link or wire fence is not possible. Because they are in contact with the ground and metal posts & current will leak into the soil.
Instead, you can install an electric fence along the wire fence. However, we’ve to make sure that the electric fence strands are not touching the wire fence or anything else that can drain power.
To keep distance between the electric fence wires & the wire fence you’ve to choose the right type of extended(long) fence insulators.
Related posts:
thank you for the information
You’re welcome dear.
What about running it around the top of a fence to stop climbers? same process?
Yeah, it’s a brilliant idea to keep your property safe from intruders(climbers). Position the electric fence wire at the top of the fence or gate by extending the height of the same posts used for the fence or install aditional fence posts. Make sure the electric fence wire don’t touch anything else. Also checkout rules in your area or state for installing electric fence at height.