A commonly asked question is, can we electrify a chain link fence? The answer is yes. But we can’t directly electrify a chain link fence because it’s touching the ground & other metal objects such as posts.
So, if we directly electrify a chain link fence, the current will constantly leak into the ground, making the fence ineffective.
The right way to electrify a chain link fence is to install electric fence wires around it. However, both fences should be insulated from each other. For this purpose, we can use extended post insulators & chain link insulators.
In this post, we’ll guide you to electrify your chain link fence or any type of wire fence.
How to install an electric Fence on the chain link?
To electrify an existing chain link fence, we’ve to install electric fence wires around the chain link, keeping them a little away from each other so they don’t touch. We can’t directly electrify a chain link fence as it’s attached to metal posts & touches the ground. This way, all the fence power will leak into the ground.
The most important thing is to keep the electric fence & the chain link fence insulated from each other. For this purpose, you can install new fence posts a few inches away from the chain link fence posts. However, a better option is to use extended post insulators on the same posts(chain link fence post) so you don’t have to install posts separately for electric fence wires. This process is known as retrofitting.
Extended post insulators can keep the fence wires 2-4 inches away from the posts & chain link fence. However, you’ve to choose the right post insulators according to the shape & type of posts.
Analyze the purpose of your fence and install the electric fence on the required side. For example, if you are installing electric fences for predators or intruders, install wires outside the chain link. Install electric fence wires inside the enclosure to keep your pets or animals from reaching or pushing against the chain link fence.
Step 1: Measure the perimeter
A parameter is the sum of the length of all sides of an enclosure. You can use a measuring tape to measure the parameters of the chain link fence. Measuring the length of the fence enclosure & deciding the number of strands will help you know how much fence wire is required & the right energizer compatible with your needs.
Step 2: Decide the number of strands
Also, decide on the number of electric strands you want to put around the chain link fence. It depends on the fence’s purpose, such as the type of animals you have kept or want to keep out of your property.
- For intruders, you can install electric fence wire at multiple points, especially at the top.
- For pet dogs, you can install an electric strand at the top to avoid them climbing & at the bottom of the fence to prevent digging.
- For goats, 3 strands placed 1 foot apart from each other are enough.
- For horses, install 3 or 4 strands 2 feet apart from each other.
- To keep deer out 3 electric fence strands spaced 2 feet apart are enough.
- While for large livestock, 2-3 fence strands spaced 2 feet apart are enough.
Tips for electric fence wire placement:
Make sure a live fence strand comes at the nose height of animals so animals can easily touch. Also, Check if the fence strands are not spaced far apart so animals can pass their head & get stuck.
Step 3: Choose the right post-insulator
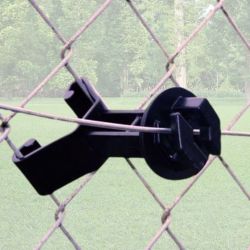
The most important step while electrifying a chain link fence is choosing the right post insulators. Fence post insulators are made of non-conductive material, usually plastic. They get mounted on the fence posts, hold the fence wires in place & prevent short circuits.
Choose fence post insulators according to the type & shape of the post. Post insulators are available for round metal posts, T-posts, U-posts, & wood posts.
Opt for extended fence post insulators as they are longer & extend the live fence wires a few inches from the post & fence.
For installing electric fence wire around chain link fence, chain link insulators are commonly used. They get mounted on the chain link fence wire & extend the electric wire 4-5 inches away.
Step 4: Choose the right fence charger
While choosing a fence charger, first think about the power source.
If a power outlet is near the fence enclosure, then it’s best to choose an AC-powered fence charger. They receive a constant supply from a home(main AC) power outlet; that’s why they are most powerful. They are ideal for long-time & heavy-duty purposes.
DC or battery-powered fence chargers are helpful in remote/portable fencing. However, you’ve to keep the batteries recharged to keep your electric fence alive.
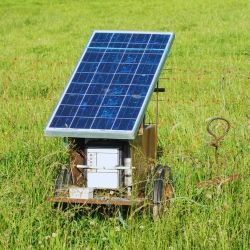
Solar-powered fence chargers are ideal for portable(remote) fencing. They automatically recharge the batteries with sunlight & you don’t have to recharge them manually. However, ensure that the solar fence charger has easy access to sunlight.
You should choose a fence charger according to the parameter(length) of the fence & number of strands(fence wire length).
A general rule to choose a fence charger:
“Divide the energizer’s distance rating by the number of strands you want to install. This is the total area you can cover with the energizer. Compare it with the actual fence parameter(length) so you’ll know if the energizer is capable of covering that area”.
For example, If your fence parameter(total length) is 3000 feet and you want to install 3 strands of electric fence. The total length of the wire will be 9000 feet. Convert it into miles 9000/5280(feet in one mile) = 1.7 miles. So, you should choose a fence charger that can cover at least 2 miles of fence wires.
Remember that electric fence chargers cover miles of wires, not miles of distance.
Step 5: Choosing the right wire
Poly wires are lightweight, & easy to install, hence, they are ideal to install to electrify chain link fences. However, as they are made of plastic, if not treated for UV radiation, they can degrade with time due to harsh sunlight.
Metal fence wires, i.e., high tensile or stainless steel wires, have less resistance than poly wires, thus maintaining a steady current flow in the entire fence. They quickly deliver the shock as compared to poly wire. However, ensure the fence wires are not too heavy for the fence post insulators.
Remember that metal fence wires are costly but serve for the long term, while poly wires cost less but are easily breakable or degradable.
Depending on the purpose, animal load, the area to be covered & your budget, choose either high-quality poly wires or metal wires.
After gathering all the stuff, it’s time to install the electric fence wires around the chain link fence.
Step 6: Install fence insulators & wires
First of all, start by installing fence insulators. Install insulators equal to the number of strands at an even distance at each fence post.
Series vs parallel wiring:
Fence wires can be installed in series or parallel wiring. In series fence wiring, a single wire(pattern) is continued to install all fence strands. Series wiring is quick, easy to install & remove, and useful for short-area fencing.
In parallel fence wiring, all fence strands are separately installed and then connected at multiple points. Parallel fence wiring is a little complicated but ideal for large-area fencing as it reduces the resistance.
At the starting fence post insulator, tie off(terminate) the fence wire. Then continue & hook the fence wire into each insulator in the row. Once one strand is completed, continue to the second and complete all the strands. Terminate the fence wire at the end post.
If you’ve installed a gate between the chain link fence, you should also add one in your electric fence simultaneously. To install a fence gate, terminate the fence wires at both gate posts.
Step 7: Install ground rods
After the fence wiring is complete, we’ve to install ground rods for your electric fence. How many ground rods you need depends on the output joules of your fence charger. As per general electric fence grounding rules: “You should install at least 3 feet of ground rods per joule output of your fence charger.”
Here are professional electric fence grounding tips:
- Each ground rod should be at least 6-8 feet long.
- Install the first ground rod with 10 feet of the energizer.
- Ground rods should be installed 10 feet apart from each other.
- Use high-quality insulated wire(6-10 gauge) & galvanized ground rod clamps to connect ground rods to each other.
Grounding is the most crucial part of electric fences & most electric fence errors are due to ineffective grounding. So, take care of each step while installing grounding for the electric fence.
Step 8: Setup electric fence charger
After the fence wires & grounding are installed, the last step is to hook up the fence charger. Make sure to install the fence energizer under a shade, in a dry & airy location. Install fence charger at some height so animals can damage it.
The electric fence energizer has two output terminals, live(⚡) & ground (⏚).
- The live terminal outputs a voltage pulse & gets connected to the fence wires. Use a high-quality insulated wire, the same as the one connecting the ground rods.
- Similarly, the ground terminal gets connected to the ground rods.
Step 9: Test the electric fence
After installing the fence, you must check if it’s working fine & generating enough voltage. You can use any fence tester, multimeter, or volt meter.
First, turn on the energizer. If you have a fence voltage tester, pinch the metal needle of the black probe into the soil. Attach the fence tester’s head to a live fence wire & the tester will indicate the voltage in your fence.
You can use any fence tester or voltage tester you have.
Electric fences usually output 5000-8000 V. If your fence voltage is quite low, it means that the electric fence is shorted out somewhere; that’s why current is leaking into the soil & resulting in voltage drop.
How does an electric fence work?
An electric fence works such that the energizer releases a voltage pulse every second that is carried to the fence strands via a wire. When someone touches the fence, current from the live fence wires enter the human body & leaks into the ground.
Ground rods are installed to catch the leaked charge through the soil. From the ground rod current reaches back to the energizer & and the circuit completes.
More current reaches back to the energizer, which will increase your fence power. That’s why sufficient ground rods & effective grounding are necessary.
Conclusion
If you know how the system works, electrifying a chain link fence is easy. We can’t directly electrify a chain link fence as it’s touching the ground & metal posts. That’s why we’ve to install an electric fence around the chain link fence on the same posts.
The main thing is to keep the chain link & the electric fence must be insulated from each other, as a short circuit will drain excessive power from your fence. For this purpose, extended post insulators & chain link insulators are very useful.
Hopefully, you’ve learned how to electrify a chain link fence, if you need any guidance, ask us in the comments below.
Related Posts: