Poor electric fence grounding and short circuits are the main reason for voltage and power loss in your fence. A electric fence short circuit occurs when a part of electric fence system touches an object, such as a metal or wood post, a wire, inside or outside the fence circuit or even grass drains its power. Current escapes(drains) from your fence to the touched object into the ground.
Loose connections also reduce your fence power. Voltage in your fence wires will be reduced up to several kilovolts.
How to Find Short in Electric Fence
The easiest way to check if there is a short in the electric fence is by testing the voltage with a fence tester. There are various types of fence testers available that can show the exact voltage or the voltage range. Test the voltage in the fence & if drops below 5KV or the optimum voltage range specified by the manufacturers and the results will indicate if the fence is short circuited or not.
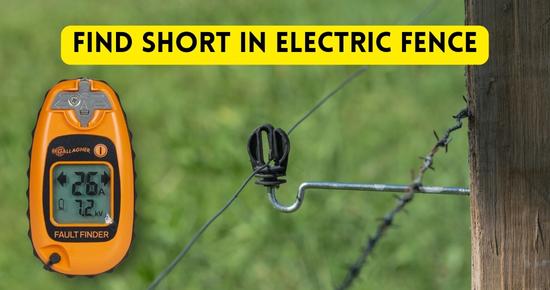
A fence fault finder is the best short circuit finder tool I’ve ever used. It measures voltage & amperage in the fence and shows the direction of the current flow that helps find the short circuits.
Remember: A normal voltage tester or multimeter is designed for testing steady current flow but not the pulsing current. Hence you’ll need a fence tester.
Common reasons and solutions electric fence short circuit :
Below we’ve listed most common reasons of short circuits and how to troubleshoot them.
1: Walk around and listen for a popping sound:
This is the most basic and old school technique to indicate a short circuit in the fence without any tester. The hotter(high power) the energizer is it’ll click more loud and illuminates brighter on the point of short circuit.
Walk along the fence line and listen for a popping/crackling sound. An electric fence wire short-circuited with metal generates a popping(clicking) sound & arcing that are highly visible at night.
2: Inspect damaged wires:
Visually inspect the entire length of the fence. Look for any obvious signs of damage such as broken wires, loose connections, or burned areas. Pay close attention to areas where the fence may have been damaged by animals, weather, or vegetation.
3: Test using a radio
Using an AM radio is a quite effective and widely used old school method to locate short in electric fence. This method works such that the electric pulses in the fence interfere with the radio frequency of the AM radio and is detected in the form of irregular noises.
Here’s how you can do it:
Materials Needed
- An AM radio
- Insulated gloves (for safety)
Steps to find short using AM radio:
1: Tune the radio on:
Turn on the AM radio and set it to a low frequency where there is no broadcasting signal. You should hear static noise.
2: Take the radio near the fence:
Bring the radio close to the electric fence. If the fence is working properly, you should hear a series of clicking noises in sync with the pulses of the fence.
3: Walk along the fence:
Walk along the length of the fence, keeping the radio close to the wires. The clicking sound should be consistent.
4: Identify changes in Sound:
Listen for changes in the pattern or volume of the clicking noise. A short or fault in the fence will cause irregularities in the clicking pattern. If you hear a drop in the clicking noise or a change in its pattern, it indicates a potential short.
5: Pinpoint the short:
Move the radio back and forth around the area where you noticed the change. The spot where the clicking sound is weakest or changes dramatically is likely where the short is located.
Inspect the Fence: Once you’ve identified the area, visually inspect the fence for obvious faults, such as broken insulators, vegetation touching the wire, or broken wires.
4: Divide and test:
While testing short circuits in a larger fence, divide the length into sections. Keep testing each section separately. This will help you narrow down the area where the short circuit is occurring.
For example: if you’ve installed gate handles at every corner. From the start of live fence wires, move toward first corner and disconnect handles from the corner and check if the fence is live. If it’ i’s still live the short is further along the fence. Because the circuit is disconnected after removing the handles and the fence being still live indicates there is a short in the next part that’s supplying power to the fence. Similarly move forward and check each side of the fence by removing handles and checking for power. If the fence is not hot/live after testing it means that the short is in the side you’ve checked. To check if the fence is live you can also use a metal post. Stick it in the ground and lean it on the fence wire; if it sparks, the fence is live.
5: Inspect insulators
Insulators are used to prevent the electric wire from touching posts or other conductive materials. Check all the insulators along the fence line. Damaged or cracked insulators can allow the wire to touch a conductive surface, causing a short circuit.
6: Check vegetation and grounding
Inspect the area around the fence for overgrown vegetation. Plants touching the fence wires or ground rods can create a pathway for the electric charge to the ground, causing a short. Clear any vegetation near the fence & the ground rods.
Any loose connection in any part of the fence circuit can also result to increase in resistance & ultimately voltage drop.
7: Inspect underground wiring (if possible):
If the electric fence has underground insulated wires, burrowing animals or machinery can damage these wires, causing a short circuit.
If you’ve installed an electric fence at a large area you must use an electric fence fault/short finder tool to make troubleshooting easier. Below we’ve discussed using some handy tools to detect and locate shorts in our electric fences.
8: Find short using an electric fence fault finder tool:
An electric fence fault finder is a useful tool to find various faults in your fence, such as short circuits, voltage drops, current leakage(amps), and short circuit direction.
Learn how to use a fence fault finder:
- Simply touch the metal part at the top of the fault-finder to the fence wire.
- Check the voltage and amperage of each fence strand after a regular interval, such as every 100 feet.
- If the fault finder reads below 5KV or below the ideal voltage of the energizer there could be a short circuit. However, the main thing is the amp reading, the higher it is the more severe the short will be.
- Follow the directions indicated by the fault finder. As the amperage reading suddenly drops it means that the short circuit has passed behind.
- Visually inspect the fence wires for short from that point to the previous point & you’ll get the point of short circuits. For example, fence wires slip from the fence insulator.
Few common causes of short circuits n electric fences:
- Fence post insulators are broken, and fence wires touch metal posts or other metal fences.
- Excessive vegetation load also drains power from fences and can make the fence wire touch each other.
- Fence Wires touching each other.
Tip: If you carry a portable radio tuned off the station at high volume along fence wires, you can locate current leaks.
Other electric fence voltage tester tools
Another most commonly used electric fence tester is the one that indicates the voltage range via blinking lights or shows the voltage ranges. Although it doesn’t give the direction of current flow(short) or exact reading. But it indicates the voltage range in the fence wires that help to identify power drop.
Hence if there is a huge voltage drop than usual or the ideal voltage range of your specific energizer, it indicates a short circuit. These testers have a black grounding probe that is attached to a ground component of the fence circuit or is pinched into the ground. Then the metal hook at the tester is touched to the fence wires. The bulb on the tester blinks indicating the voltage range.
Ideally, your fence should have at least 5000V; however, higher is better. If 1000-2000 V drops then the regular voltage in your fence it indicates short circuit in your fence.
Frequently Asked Questions
1: What is a dead short in an electric fence?
Dead short occurs in large area fences when they are shorted at a very long distance. When the short-timed voltage pulse reaches the short circuit point, power leaks from your fence and voltage(power) drops. Therefore the current will take longer to reach the entire fence and may not be able to power the entire fence, leaving part of it unpowered. Such circuit failure is called a dead short.
Conclusion
Short in the electric fence occurs for several reasons, such as any metal object or wire touching fence wire, broken or lose grounding, loose fence wires touching posts or each other.
You can use several tools to prevent the whole fence inspection. A fault finder makes the fence short-finding task quite easier by locating the current flow and short circuit direction.
If you still find anything difficult, ask us in the comment section.