
Poly wires, ropes, and tapes have metal strands fastened in polyethylene and polyester fibers. It’s lightweight, easy to install, and cheaper than metal wires. You should use poly wire for the shorter area and poly rope for large-area fencing.
For temporary fencing, such as portable grazing fields or short areas, poly-wire electric fences(braided wire) are commonly used. It is easy to install and wind back for later use.
Below, we’ll discuss each step to install a poly-wire electric fence in detail installation. Plz carefully read the complete guide.
Benefits of poly wire/rope:
- Polywire is made of soft fibers and thin metal filaments, prevents injury to agile animals, such as horses and dogs.
- They are available in various colors & striped patterns, hence offering greater visibility.
- Also, someone stuck in the fence will be less affected than barbed or high-tensile wire.
- Polywires and ropes are easy to install and spool back; hence, they are ideal for temporary fencing. But don’t tightly roll up the electric fence as the metal stands can break.
First, choose the right poly wire for your electric fence:
Polywire is commonly used for short or large area coverage, as it’s economical and easy to install. Polywire and ropes contain metal strands(filaments) braided into polyethylene, polypropylene, or polyester fiber rope. Traditional metal electric fence wires are used for permanent fencing, covering a greater area, and keeping large livestock, but they cost a lot more.
Here are key factors to focus on while choosing the right poly wire to make your fencing project successful.
1. Polywire or Polyrope – Choose the right thickness
Poly wires have 3, 6, or 9 stainless steel, aluminum, or mixed metal strands. Polywires with more metal strands are more current conductive. Polywires are available in 1.5,2,2.5, and 3mm thicknesses. Poly wire is helpful for lightweight & short-area fencing.
Poly ropes are thicker and stronger, hence ideal for large-area fencing. They usually have 6, 9, or 12 metal strands. Electric fence ropes have more strength and visibility than poly wire; hence, they are ideal for keeping large livestock.

Polywires are usually available in 3-15 metal strands. For better current conductivity, choose poly wire/rope with at least 6-9 strands. The cost also increases as the thickness and number of strands increases.
2. Quality of conductors and resistance
Resistance is the electrical quantity & force opposing the current passing through a metal(conductor). A metal having the least resistance is considered a better conductor. Metal strands in the poly wire are usually made of stainless steel, tin, or copper.
- Stainless steel strands are stronger but less conducive to covering longer area fencing.
- Mixed metal strands have less resistance and are better conductors, but they are breakable and more prone to rust with time.
Each conductor has some resistance, but we’ve to choose the one with minimum resistance(highest conductivity) & greater strength.
3. Inspect the product quality
Check out the wires made quality. A quality poly wire is neatly woven and braided with metal strings. Check if the product is treated for UV radiation and sunlight. Local products get damaged or degraded in hard conditions such as sunlight.
4. Pick a detectable color
Usually, poly wire is made of two colors(red-black or yellow-black), which makes it easily visible and signifies a boundary in the minds of humans and animals.
Polywires are available in various color combinations, such as white, yellow, blue, black, and red. Two-color stripe poly wires offer better visibility. Choose a color that contradicts(looks easily) the background.
Choose the poly wire diameter according to the sizes and nature of the kept animals. Use thick poly wire with colorful stripes for horses and large livestock up to their chest. For goats or smaller livestock, you can use poly wire.
Poly wire costs quite little and is available in various thicknesses, so choose one that is strong and can bear the animal’s load.
5. Check out customer feedback:
While buying poly wire, check out the buyer’s reviews about the product and company online. Buy the wire from a reputable brand, and don’t go for a low-quality, cheap product.
How to Install a Polywire Electric Fence?
For poly wire electric fence installation:
- First, choose the right thickness and required length of poly wire.
- Then, decide the fence height, number of strands, and post type(wood, metal, or plastic).
- If using metal posts drive them directly into the ground or dig post holes for the wood posts.
- Install post insulators on the post.
- Decide whether to install a series or parallel circuit wiring.
- Terminate/tie off the fence wires at the corner post insulators. Then pass wires through all the post insulators. This way, complete all fence strands.
- Install ground rods (3 ft/per output joule of energizer) and connect them with high-quality insulated copper or galvanized steel wire (11-15 gauge).
- Connect the ground rods back to the ground terminal on the charger & live terminal to the live fence wires.
- The circuit is complete. Now just make sure there is no short circuit & wiring is installed securely.
Note: For effective electric fence installation, make sure every connection is tight. Secondly, all electrical components should be protected from short circuits from everything, even from grass.
Follow the step-by-step detailed guide:
Step 1: Decide the fence perimeter
For installing any type of fence, the first step is to measure the length of the enclosure(area to be covered). It’ll help you decide how many fence posts & the length of wire is needed. To measure the length, you can use a long measuring tape.
Although people also suggest using GPS, sometimes it’s not that accurate due to harsh weather or obstacles like buildings. Simply measure the length of the perimeter(sum of all sides of the area). After deciding on the fence layout, drive stakes at the corners for remembrance.
Step 2: Install fence posts
Now you’ve to choose the right posts (wood or metal) & install them at regular intervals (10-15 meters). Fence post selection depends on the fence weight, animal type, and whether the fence will be temporary or permanent. You can
- Wooden posts are ideal for permanent fencing, large area coverage & large livestock, i.e., cows 7 horses.
- For small to medium-sized area coverage & to keep medium-sized animals like sheep, you can install T-posts. T-posts and U-posts are ideal as they can be easily installed & removed. However, there are higher changes in short circuits as T-posts are all metal.
- Plastic fence posts are also helpful for poly wire fence installation in portable pasture fencing and to keep smaller animals.
Also, decide on the post’s length according to the animal’s height.
Remember: 1/3rd of the posts have to be driven into the ground.
Calculate the number of posts needed:
How many posts you’ll need to cover the measured area depends on the type of post & spacing. For example, wood posts can be spaced up to a maximum of 20 ft. While T posts are spaced a maximum of 8-12 feet.
Simply decide the optimum spacing according to the conditions & divide it by the total length of the perimeter. For example, if the fence perimeter is 200 feet & you are using wood posts, you’ll need (200/20) 10-12 posts.
Installing different types of fence posts:
T-post installation:
You can directly drive t-posts and u-posts using a manual post driver(or a similar pipe), an electric post-pounder, or a bucket tractor or loader.
Wood posts installation:
Wood posts, being heavier & thicker, get installed by digging holes & using concrete. By choosing sharp-end wood posts, you can also drive them directly.
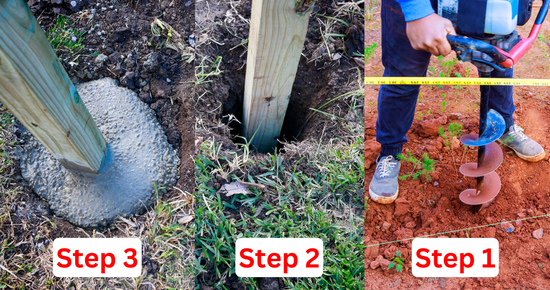
Step 1: Dig post holes
A digging bar, post-hole digger & a manual auger are most commonly used to dig post holes, especially useful in moist soil. As these tools require a lot of effort, they are ideal for a few post holes. For digging a large number of holes or on hard ground, you should use an auger drill.
Note: As per recommendation, a post hole should be 3 times the post diameter.
How deep(underground) should fence posts be?
For sturdy fencing, ⅓rd of the posts should be grounded. For example, a 10 ft post should be at least 2.5-3 feet grounded.
Step 2: Set wood posts in concrete:
- Use fast-setting concrete because it sets in 30 minutes and is useful for quickly setting heavy wood posts.
- Place your fence post vertically in the hole and put some gravel in it(optional). Use a level tool to check if the posts are straight.
- Then, pour the fast-setting concrete mixture until the hole is completely filled.
- You can either make the mixture before & fill it into the hole & then insert the post in it. Or place the fence vertically straight, pour dry concrete in the hole & then add water until the whole mixture is wet.
- Support the post with wood logs for 30 minutes till the concrete mixture sets. In the same way, install all fence posts.
Step 3: Decide the height and number of fence strands
Decide how many strands of electric fence you need to install, depending on the animal’s height & the purpose of the fence. Install at least 3 strands 20-22 inches apart (1.5 – 2 feet) for large livestock. While for sheep, & goats, keep the distance less, up to 12 in(1 ft).
To know how much length of fence wire will be required, multiply the number of strands by the measured length of the perimeter.
Step 4: Install fence post insulators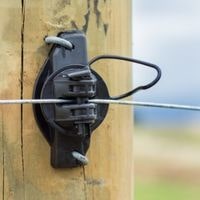
After installing the posts, it’s time to install fence post insulators. Post insulators keep fence wires from touching fence posts, keep them in place, and prevent short circuits.
- If you’ve installed wood posts, use insulators that are screwed into the wood, such as ring insulators.
- While T-post & U-post insulators are wrapped around the post.
- Corner post insulators are installed at corner posts, and they are used to tension and terminate fence wires.
- According to the decided number of strands & spacing, install an equal number of insulators at an exact distance.
The lowest fence strands should be at least 1 foot above the ground so it doesn’t touch grass or soil. Keep distance in fence wires according to the animal’s height and the number of strands.
Step 5: Install fence wires
You can install fence wires/strands in series or parallel wiring. In series fence wiring, all strands are connected in series(one after another). Series wiring is easy to install and ideal for short-area fencing. It’s because a single wire pattern is sufficient to transmit charge in the whole fence wires. However, a single break in wires will stop the current flow in the circuit.
In parallel wiring, all fence strands are separately installed and then connected to each other at multiple locations. Current flows in all wires, even if a wire is broken. Parallel wiring is ideal for large area coverage as multiple connections in fence wires offer multiple points for current conductivity & reduce resistance.
First of all, terminate the fence wire at a corner post & pass the fence wire through all the insulators. Tension the fence wire as much as needed, but don’t over-stretch, as the poly wire is fragile & breakable. Pass fence wire through the other corner post insulators and complete the whole fence strand. In this way, either complete all fence strands continuing with the same wire or terminate each fence strand separately.
How to end a poly wires fences?
Polywire or any fence usually starts and ends at the corner post.
To terminate a poly wire fence:
Method 1: Making a conventional termination knot
- Install end/corner post insulators. Then, pass the poly wire’s end through the insulator. Pull the wire’s end to tighten the fence.
- At last, tightly tie (knot) the wire’s end back to the fence wire.
- Poly wires are soft/flexible, so you should make at least 2-3 tight knots.
Method 2: Use crimp sleeves to terminate the wires more easily
- Pass the crimp sleeve through the fence wire. Insert the wire’s end through the insulator and pass it again through the crimp sleeves.
- Tighten the wire and press the crimp sleeve with a crimping tool.
- Use more than 1 crimp sleeve for a secure joint.
Step 6: Install Electric fence Grounding(rods & wires)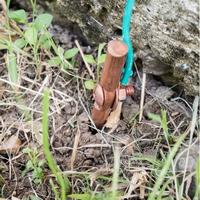
Electric fence grounding is another important part of electric fencing. Effective grounding is necessary to complete the circuit, & effectively catch the whole electric charge that leaks into the ground after a shock is delivered.
The required length & number of ground rod depends on fence charger output joules. For effective grounding, It’s a general rule to install at least 3 feet of ground rods per output joule by your fence charger. For example, If your fence charger outputs 10 joules, you should use 30 feet of rods underground.
Each ground rod should be 6-8 feet long. In general, you should use at least 3 ground rods for the electric fence.
- Install the first ground rods near the fence charger at the start of the fence & space them 10 feet apart from each other.
- Drive ground rods using a post driver or a hammer or mallet & leave them a few inches out of the ground.
- Use a thick gauge, highly conductive & insulated wire to connect ground rods, such as 10-12 gauge insulated steel or copper galvanized wires that support a 20KV load.
- Use ground rod clamps to join the ground wire to the ground rods.
Step 7: Connect the electric fence energizer
A highly conductive & insulated wire should be used to connect the energizer, the same as used for connecting ground rods. For short-area temporary fencing, you can also use poly wire or rope having a greater number of strands.
Connect poly wire/rope to the energizer:
First, measure the length of wire needed from the energizer to the fence wires. Remove 3-4 inch insulation from both ends of the connecting wire. Tightly twist one bare end of the wire around the energizer’s live terminal & screw the terminals tight. The end of the wire should be tightly connected to the start of electric fence wires. You can use highly conductive crimp sleeves or split bolts for this purpose or simply tie a knot.
If using a poly rope, burn both ends of the poly wire to expose the metal filaments and ensure better current conductivity. Wind the metal filaments around the fence charger terminal and tie the other end to the live fence wire.
Connect the energizer to the ground rods:
Similarly, measure the distance between the energizer and the ground rods and take an equal length of wire. Remove the ends using a cutter. Then, tightly twist one end around the energizer’s ground terminal & hook the other end to the nearest ground rod.
Now, connect the energizer’s input terminals to a power source. If you have a DC fence charger, connect the +ve input terminal to the battery’s positive and the negative terminal to the battery’s negative. If you have an AC fence charger, insert the input power plug into the output.
Step 8: Test the fence:
After the electric fence installation is complete, it’s necessary to test if everything is set up correctly. First of all, ensure that every electrical connection between the fence is firm & secure. Also, check if the fence wire or any part is shortcircuiting or not. Ensure that your fence wires & components are not touching each other or anything out of the circuit.
- Finally, turn on the electric fence energizer.
- Take an electric fence tester or voltage tester & measure the voltage in the fence.
- If the fence is working fine, the voltage tester should show the optimum voltage range of the energizer.
- If the voltage is dropping enormously than the ideal range, there are short circuits in the fence for sure.
- You have to inspect the fence & remove the short circuit.
Conclusion
A few key things to keep in mind for effectively installing poly wire fence:
- Choose colorful poly wire or rope with a greater number of strands for better conductivity & long-term use.
- Choose the right post insulators according to the fence wire’s strength and type of post.
- Do parallel wiring for longer and permanent fencing.
- To connect the poly wire to any conductive part of the fence, i.e., rods, energizer, or twisting itself), burn the ends to expose metal string/strands and improve current conductivity.
- Use highly conductive wire & insulated wire to connect ground rods & set up the energizer.
- Make every joint sturdy & your fence short-circuit-proof
If you still need any guidance, ask us in the comments.
Related Guides: