You’ll need post insulators to attach fence wires on the t-post. For t-posts, choose a post insulator according to wire type, strength, and length of the insulator(to keep wires away from posts).
Benefits of t-post insulators in that they can be clipped on the t-post without tightening screws or driving nails.
In this post, we’ll discuss how to install an electric fence on T-posts
How to install an electric fence on T-posts?
To install an electric fence on the t-post, we use post insulators.
- First, install t-posts at regular intervals(10-20). While fencing larger areas, you should incorporate wood posts with T-posts, at least at the corners.
- Choose T-post insulators that are long-lasting & can bear the weight of the fence wires & keep them from touching the posts.
- On each t-post, install insulators equal to the number of strands & at the right height & interval.
- Then, pass the fence wires through the insulator. Use corner post insulators to tension & terminate fence wires. You can use crimp sleeves or a termination knot to end fence wires.
- Install at least 3 6-8 feet galvanized steel or copper-coated ground rods and connect them with high-quality insulated wire.
- Attach the fence charger’s live terminal to the fence wires & the ground terminal to the ground rods.
Make sure to install the t-post outside the fence; the post insulators should be facing toward your fields. So that the fence wires can be placed inside and animals can’t reach the t-post.
Follow the step-by-step guide below:
Step 1: Install T-posts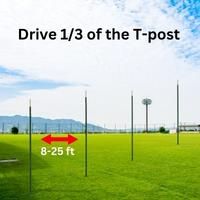
T-posts are designed to be directly driven into the ground. We can use different tools depending on the availability, ground hardness level, and number of t-posts.
T-post spacing:
T-posts can be spaced 10-25 feet apart depending on the weight of the wires, animals’ pressure on the fence, ground condition, and how deep T-posts are driven. If the ground is soft, fence wires are heavy & you’ve kept many or large-sized animals, keep the distance less. If the ground is hard, you can space T-posts at a greater distance.
According to rules, “1/3rd of the T-post goes under the ground”.
Tools for driving T-posts:
- A manual post-pounder is the most handy tool for driving t-posts and u-posts. It can be used for a few to a large number of posts.
- You can also use a similar heavy pipe closed from an end to drive T-posts.
- An electric post-pounder is quite a powerful tool helpful for installing many t-posts effortlessly.
- A tractor or loader equipped with a bucket can also be used to drive T-posts.
Step 1: Choose the right post insulator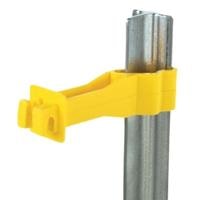
T-post and u-post have specially designed insulator that fits on the post structure. Make sure to buy sturdy post insulators according to the fence wire weight. T post insulator keeps the fence wires away from the posts(in place) and helps to prevent short circuits.
The extended T-post insulator extends 3-5 inches from T-posts and keeps the wire away from T-posts. However, the long plastic body is not durable. Corner post insulators are used to terminate the fence wires at corner posts.
While purchasing post insulators, ensure they can support the fence wire weight and that the wire won’t slide out.
Step 2: Install insulators on t-posts & corner posts
Ensure you install post insulators equal to the number of strands (wires) in your fence. Ensure that all insulators are at the same height and distance.
Example: If the fence has 4 wire strands, install 4 insulators at an even distance(1.5-2 feet). Use a measuring take to mark spots
Steps:
- Place the post insulator at the required height.
- Stretch the clips(jaw) at the back of the insulator and clip them over the t-post edges.
- Rotate the insulator to fix it in the right direction.
- Ensure the insulators are facing toward your fence wires.
You can easily remove t-post insulators by stretching the jaws holding the t-post.
Install corner post Insulators:
Use corner post insulators, such as donut insulators, instead of normal insulators at corner t-posts, especially for hard fence wires. You can also use them to tension fence wires.
Steps:
- Take a metal wire and pass it through the corner post insulator.
- Wind the corner post insulator wire around the t-post at the required height.
- Tightly twist(wind) the extra wires around each other to tighten the corner post insulator.

Step 3: Install fence wires
After installing the post insulator, pass wires through its holes/hooks(wire holders).
After you’ve installed insulators on the t-post, pass the fence strands through the hole or hook that holds the wire.
Install the corner post insulators at the right height. Pass a wire through the insulator and t-post holes, and wind the excess wire to tighten the insulator at the corner post.
Pass the fence wires through the corner post insulators. Use split bolts or crimp sleeves to end the fence or tighten the fence wires.
Series Vs. Parallel fence wiring:
If you want to install fence wire in series, start from one end, complete one fence strand, and continue the same wire to the other.
While for parallel wiring, you have to install fence strands separately and then connect all the rows with wires at different points in the fence.
Series wiring is applicable at small area fencing. The current won’t pass further if there is a breakage in a fence wire.
A parallel wiring system is helpful in large areas since all wires are connected at multiple points. Due to the multiple paths available, the current still follows the entire fence, even if there is a short or break in a strand.
Step 4: End the fence wires
To end the fence wires, use a corner post insulator. Corner post insulators are designed to tension and end fence wires, are stronger, and can bear more force.
In comparison, normal t-post insulators are fragile and easily breakable.
Step 5: Install electric fence grounding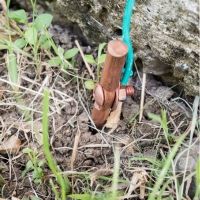
Grounding is the most important part of any electric circuit. In electric fences, grounding completes the circuit & when someone touches the fence, it takes the charges from the soil back to the energizer, improving the fence’s power. You should install at least 3 ground rods per recommendations for better results.
Parts of electric fence grounding:
- Ground rods:
You’ll need 3 feet of ground rod per joule output of the fence charger. For example, if you have 10-joule fence chargers, you’ll need 10X3 = 30 feet of ground rods. Each ground rod should be 6-8 feet long.
The most commonly used metal for grounding rods for electric fences is copper or galvanized steel to prevent rusting & ensure better current conductivity.
- Ground rod clamps:
Make sure clamps are made of the same metal as the ground rods. Use galvanized steel ground rod clamps to prevent rusting & long-lasting results.
- Wires for connecting ground rods & energizer:
Use 10-14 gauge insulated metal wires rated for 20KV to connect ground rods. The same wire will be used to connect ground rods to the energizer.
Electric fence ground wires must be insulated so that it does not short circuit with anything & leak the charges(current) that are returning back to the energizer.
Step to install electric fence grounding:
- Start driving the ground rods. The first ground rod should be within 1-20 feet of the energizer. Space ground rods 10 feet from each other. The ground rods should be installed 3 feet away from the fence lines.
- Choose damp(moist) & deep ground levels/spots for better current conductivity. Water the ground near the rods after a few days.
- Use a post driver or mallet to drive ground rods. Leave a few inches out of the ground.
- Cut the length of the wire equal to the distance between the ground rods. From both ends, peel the insulated wire 2 inches. Unscrew the ground rod clamp & slide one over each ground rod.
- Insert the bare wire end in the ground rod clamp and screw the bolt again. In this way, connect all ground rods.
Step 6: Install the fence charger
After installing the fence wires & ground rods, it’s time to attach them to the energizer. Place the fence charger in a ventilated area at a normal temperature.
Steps:
- Cut off pieces of wires from the live terminal to the fence wires & the ground terminal to the ground rods. Peel the wires from both ends.
- Unscrew the energizer live terminal. Twist the wire’s end around the terminal 2 times & screw the bolt tight.
- Now take the other wire, and screw it into the nearest ground rod clamp. Then unscrew the energizer ground terminal & twist the metal wire end around the terminal.
Tip: Make sure that every electric connection (joint) is secure. A loose connection can reduce up to 500V from your electric fence.
After you’ve set up the fence, test it with a fence tester or any voltage-measuring tool.
Frequently Asked Questions
- How far apart should the t-posts be for the electric fence?
T-posts can be spaced 8-20 feet depending on the ground hardness, weight & length of fence wires & animal’s load.
- Can I use a T-post to ground an electric fence?
The T-post is made of steel, which conducts electricity well. T-posts are less expensive than copper-coated ground rods. Galvanized T-posts can be used to ground an electric fence.
As the ground rod is driven completely into the ground, only a few inches remain above the ground. It would be quite difficult to install T-posts completely. You can also ground your electric fence with rebar.
Conclusion
A post insulator is the most useful tool to install an electric fence on a t-post. T-post insulator keeps the fence wires in place and prevents them from touching metal posts, causing short circuits. So give more time to finding the best t-post insulator that fits all your requirements.
Install them in the right direction, at an equal distance, on each t-post. Pass fence wires through the insulators.
Follow the detailed guide above to install an electric fence on t-posts.
If you have any queries, ask us in the comments below.