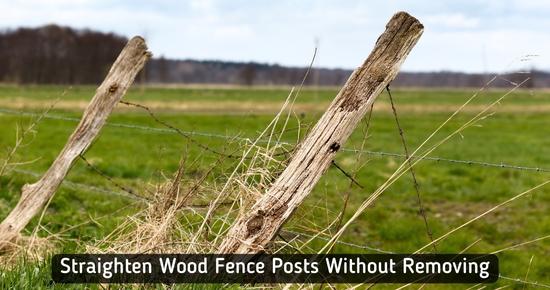
Are you concerned about reinforcing (repairing) your leaning wood fence posts alone without removing them from the ground? The good news is there are several DIY methods & tools to help you straighten your fence posts single-handedly, but choosing the right tool is the key.
In this post, we’ll discuss how to straighten wooden posts without removing them from the ground using some DIY methods & tools available in the market. Also, why wood fence posts lean & how to prevent it for longer stability of your fence.
Note: This post is only for straightening wooden fence posts.
Read the complete guide carefully and check out the videos for easy explanations.
How to Straighten Wood Fence posts without removing them?
- The DIY Costless Method:
You can drive a long metal rod/pipe opposite to the leaning side of the fence post. Pull the post straight & tightly tie it to the rod using a strong wire or metal strapping. The rod will hold & support your fence post.
- Tools designed to straighten fence posts without removing:
We can use fence post repair tools such as a fence mender, fence post-doctor, post buddy, or Fix-A-Fence tool. These tools work such that we drive them adjacent to the post in the concrete base to fill the extra space & make the wood post base tighter again.
The fence mender & post doctor get driven into the concrete base of the fence post. It fills the extra space in the concrete base, making the post erect again. Then screws are drilled through the metal plate into the wood posts. As a general idea, per piece costs around 15-20$.
The Fix-A-Fence tool is another fast & simple solution to reinforce leaning wood posts. It has two long flat metal plates (pieces) welded to both ends of a horizontal metal plate in opposite directions. One metal plate gets driven into the ground, while the other gets attached to the wood post by driving screws. One piece is used per post & costs around 25-40$ each, depending on the quality & thickness of the post.
Similarly, Post Buddy is a long(2.5 feet) hard metal strip that gets driven between the wood post & concrete base. Then, the part out of the ground is attached to posts using a drill. Each piece usually costs around 9-10$, and at least 2 pieces are required for each post.
Remember:
- These tools work as a quick fix to reinforce fence posts & prevent them from leaning further. They save time and energy by preventing the need to remove and reinstall fence posts.
- However, these tools won’t fix the post 100% & it may become loose again. To make your fence posts immovable, you’ll have to remove them from the ground, inspect their condition, install a new one, or reinstall them in a strong concrete base.
Below, we’ll discuss in detail some handy tools & DIY methods to fix leaning wood posts without removing them.
Method 1: Tie the leaning fence to a support
In this method, no costly tools are required. We’ll simply drive a metal rod(pipe) opposite the leaning side of the fence post & tightly tie it to the post. The rod will support the fence, making it straight.
Tools required:
- A 7-8 long & sturdy metal rod, depending on the height of the fence.
- Metal strapping or a hard metal wire.
Steps:
- On the opposite side of the inclination, drive the rod 3-4 feet into the ground using a post driver, a heavy metal pipe closed from an end, or any post-driving tool. It should be driven exactly in front of the fence post & around 2 feet away.
- After that, take a metal wire, chain, or metal strapping(having holes).
- Now, push the fence straight.
- Take a metal wire and turn it around the metal pole & the leaning fence post & tie the ends of the metal wires.
- If using metal strapping, cut pieces that are long enough to be connected at both sides of the fence post after turning around the pole.
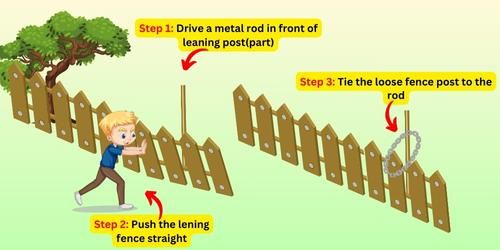
- Now, push the fence post straight.
- Place one end of the metal strapping at one side of the fence post. Use a screw drill & drive screws through the holes on the metal strapping into the fence post.
- Now turn the metal strapping around the pole & tightly attach its other end to the other side of the fence post by driving screws.
- In the same way, tie the wood post to the pole at least 3 times at regular intervals.
Similarly, other than a metal bar, you can tie the leaning fence post to a sturdy support, i.e., a wall or tree, etc.
Method 2: Using T-posts to straighten a wooden fence: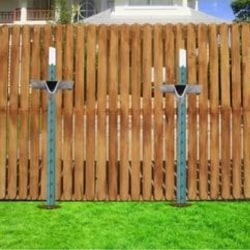
This method is quite similar to the first one & I’ve personally tested it. I used T-posts & T-post adapters to support privacy wood fence in my grandma’s backyard.
What I did was to drive wood posts at the centre of two fence posts. It’s because T-posts can’t be driven near the concrete base of the wooden posts.
I pushed the fence straight & supported it with rectangular wood logs. Instaed this you can also ask someone to hold the fence straight.
Then I derived a wood post at the centre of two wood posts opposite to the leaning side of the fence using a post driver. I would recommend using the highest quality T-posts as it’ll have to bear the heavy-weight wood fence.
You’ve to make sure the T-posts get driven very close to the fence. Drive them as deep as possible into the ground as I drive them up to 4 feet. The more part of T-post you’ll drive the more weight it can support.
Then I got 2×4 inch T-post wood adapters that I bought at around 3$ per piece from Afence. These T-post wood adapters get mounted on the T-posts & attached to the wood fence by driving screws through the hole in the adapter.
The fence is still straight even after six months & the DIY method I thought & tried worked well for me.
Method 3: Drive fence post mender in the post’s base
A fence post mender is a steel bracket or sleeve that is designed to fit around 4×4 & 6×6 wood posts & reinforce them without removing them from the ground.
A fence post mender is useful for fixing leaning wood posts that have been weakened by rot or get loose but are still in good condition to be saved.
Tools required:
- Fence post mender
- Hammer
- Screw Drill
- Wood screws
Steps to Install Fence Post Mender:
- To install a post mender, first, clean the ground around the fence post to expose the concrete base.
- Remove any fence panel attached at the bottom of the fence post. It’s because the fence post mender fits around the fence post, and if a wood panel or screws are in the way, you can’t adjust the mender around the post.
- Ask someone to push & hold the post straight. Or you can use a wood log for support.
- Adjust the post mender around the bottom of the fence post. The sharp/spike end should be downward.
- Make sure that the fence mender tool firmly wraps the fence post.
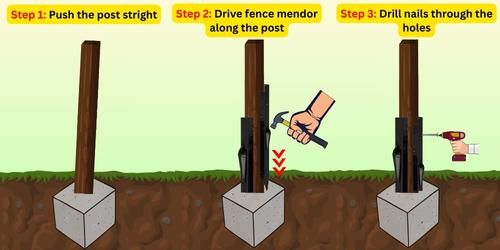
- Take a hammer and hit it on the curved part of the fence mender. The fence mender will start driving into the ground.
- After the mender is grounded up to the curved(marked) part, drive screws through the hole on all sides of the post mender into the fence post.
Although a fence mender will reduce the post’s shakiness without removing it, but won’t fix it up to 100%.
Checkout the detailed video below:
Fence post doctor: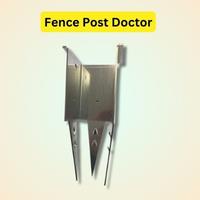
A post-doctor is another post-repairing tool similar to a fence post mendor. It covers 3 sides of the post underground & fills the gaps to make the fence post straight.
Steps to install:
- Support & straighten the fence post.
- Then, wrap the post doctor at the base of the post.
- Drive it into the ground using a hammer.
- At last, drill screws using a screwdriver drill from holes on all sides of the post doctor into the wood post.
Method 4: Postup Fence Post Repair Kit (The Fix-A-Fence)
The Fix-A-Fence tool, also known as a postup fence post repair kit, is used to reinforce a leaning(loose) fence post without removing it from the ground.
It’s a simple post-repairing tool having two metal bars welded at the opposite side of the offset metal piece.
Tools Required:
- Postup Fence Post Repair Kit
- Screws
- Screw Drill
- Hammer
Steps to install Postup Fence Post Repair Kit:
- First of all, clean the ground all around the fence post.
- Level(balance) the fence post straight. Ask someone to keep the fence post straight or use support from the leaning side of the fence. Use a level tool to check if the fence is vertically straight.
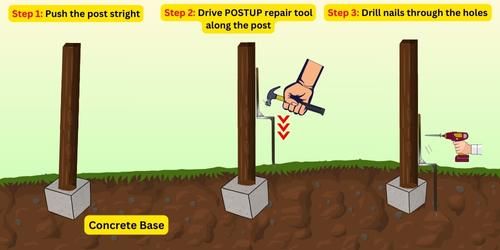
- Adjust the POSTUP repair kit with the fence post such that the sharp(spike) end is downward. While the other metal plate is touching the fence post.
- Use a hammer to drive the spike(sharp) end into the ground.
- After it’s completely driven into the ground, drive screws through the holes in the POSTUP tool into the wood post using a screwdriver drill.
Remember: While driving the spike end, the other bar must be in contact with the fence post; otherwise, it’ll be installed wrong.
Watch the complete video below to understand how the Postup fence post repair kit works.
Method 5: Straighten wood post using Post Buddy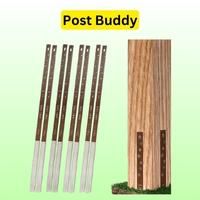
A post buddy is another simple, useful & low-cost tool to fix sagging wood posts set in concrete.
Tools Required:
- Tube buddy tool
- Hammer
- Screw Drill & screws
Steps to install Post Buddy:
- First of all, we’ve to clean the ground all around the fence post so that the concrete base is visible.
- Then, level the fence post with a supportive wood log or ask someone to keep the fence post straight.
- From the opposite side of the fence post’s leaning position, drive the post buddy tool into the ground. Drive it at least up to the marked lines.
- Make sure that the fence buddy tool is driven exactly along the fence post, and it must be touching the post.
- The extra space in the concrete will be filled, which is making the fence post loose(lean).
- At last, screw the nails into the fence post through the hole on the tube buddy straps.
Why do wood fence posts lean & how to prevent it?
- Underground moisture causes wooden fence posts to rot(decay) & lean.
- If the water continuously builds up near a fence post, the ground will get soft. Heavy winds/storms will shake the fence, shifting and leaning the posts.
- During summer and winter, the fence posts & concrete bases expand or contract, making space around the post. As a result, the fence post will get loose & lean.
- The heavy fence post will not bear the load if it is set in a thin concrete base & will lean or fall.
- If the fence posts are directly installed into the ground without a concrete base.
Tips to keep wood fence posts from leaning:
- Pound the soil around the post with a hand compactor so the loose soil layers get compressed again.
- Remember, wood or heavy metal posts should not be installed without concrete.
- For sturdy fencing, the post hole must be 3 times the diameter of the fence post.
- If your fence post is completely rotten, the only option is to install a new one.
- While installing fence posts, wrap the post’s undergrounded part with a fence post rot protector(cover). So that moisture, decaying bacteria(fungi) & insects can’t rot/decay the fence post.
Conclusion
I’ve personally applied all these methods to fix my sagging wooden fence posts. These methods allow you to recover your leaning fence posts all alone without removing them.
However, you should choose a tool or method depending on your budget & the tools required for installation. For most methods, you’ll need a hammer & a screw drill.
Read the complete guide above, and if you have any queries, ask us in the comments.
Related Guides: