Grounding is the most important part of an electric fence circuit. Any circuit must have a complete loop so that the current reaching the device can return back to the power source. Like any other electric circuit, electric fences must be grounded in order to work properly & safely.
If not grounded, your fence will not work(delivers shock) because the circuit is incomplete. There will be no path to take the current leaked into the ground, back to the energizer. The incomplete circuit will deliver either no shock or
This post will discuss why electric fences must be grounded and how to install grounding properly.
Does an electric fence need to be grounded?
Yes, grounding is the most important part of any electric circuit. In electric fences, when a human/animal touches the electric fence wire, current passes through their body to the soil. Grounding is necessary to carry the lost charge from the soil back to the energizer. For this purpose ground rods are installed & connected to the energizer’s ground terminal to return the free electrons from the soil.
Without grounding, the electric fence circuit is incomplete. The current that leaks into the soil doesn’t have a path to reach back to the energizer & will be permanently lost, reducing your fence power. In order to complete the circuit & deliver a shock the ground terminal of the fence charger & the human or animal should have a strong connection to the earth.
Let’s take an example if the human is highly insulated from the ground such as wearing insulated shoes or standing on a non-conductive material or animal hooves will prevent the current from passing the human/animal’s body. The shock is delivered when the living being is well connected to the ground. Because shock is delivered as a reaction to when current is able to pass through the human body into any other object or ground. A weak connection to the ground will result in weak or no shock.
Similarly, if there is a weak or no connection at the energizer’s ground terminal, the current can’t return back to the energizer will result in power loss from the fence. Hence effective grounding is necessary to have a strong electric fence
What is electric fence grounding?
In normal electrical circuits, grounding (ground circuit) is installed to dispose of the unwanted current into the earth in case of electrical faults.
In an electric fence circuit, grounding is the return path of the current that takes the free charges from the soil to the energizer.
Via grounding rods & wires, the current will return to the energizer and complete the circuit. Hence the ground(soil), any ground wire or ground rods combined make electric fence grounding.
How does electric fence grounding work?
Electric fence grounding consists of ground rods & wires. Ground rods catch the charges from the soil & the wires take them back to the fence charger.
Remember, the earth is also part of the electric fence ground circuit. Electric fence wires are insulated from touching the ground, so the circuit remains incomplete until someone touches the fence.
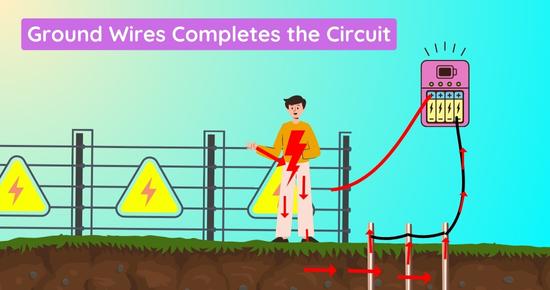
When someone touches the fence, their body completes the path between the fence wires and the earth. Current passes from fence wires to the human/animal body and leaks into the soil. Due to moisture in the soil, charges travel to the ground rods and reach back to the energizer via the ground wires.
To receive a shock, a human/animal must be connected to the earth or any grounded object so that the current can travel back to any grounding part i.e. soil & return back to the energizer.
Grounding in Hot-Ground electric fence
In hot-ground electric fence, the electric fence grounding is done slightly differently. Such electric fences are installed in extremely dry or rocky earth conditions, where current can’t travel into the soil due to low humidity.
Hence the ground strands are installed insulated & parallel to the live strands. The ground strands are directly connected to the energizer ground terminal. Such an electric fence circuit delivers a shock to the human or animal when it touches both live & ground strands.
The current will travel through the live fence wire to the human body & return back to the energizer via the ground strands, hence the circuit completes.
How to properly ground an electric fence?
For a sound electric fence ground system, we’ve to choose the right products and install them correctly making sure there is no loose connection.
Tools Required:
- Ground rods(3 feet per output joule & at least 3 ground rods).
- Highly conductive & insulated wire to connect rods.
- Ground rod clamps connect the ground wire to the rods.
Step 1: Determine the number of ground rods required:
To install electric fence grounding, you should first decide how many ground rods will be required.
How many ground rods are needed for the electric fence?
How many ground rods you’ll need to ground an electric fence properly depends on the fence energizer’s output joules(power).
Manufacturers recommend installing 3 feet of the ground rod per output joule of the electric fence charger. For example, if your fence charger outputs 10 joule, you must install at least 10JouleX3 feet = 30 feet of rods. However, it’s ideal to install a minimum of 3 ground rods to effectively ground an electric fence
How long should the ground rod be for the electric fence?
Each ground rod should be 1/2 to 3/4-inch thick and at least 6-8 feet long. A longer rod that is driven deep into the ground will catch more electrons(charges) through the soil. Use more ground rods in dry or rocky soil conditions and as deep as possible.
Because The deeper you install ground rods, the more charges will be attracted. It’s because lower soil layers have more moisture, which improves current conductivity.
Each ground rod should be installed 10 feet apart from the other.
Is one ground rod enough for an electric fence?
You can use one ground rod for a very low-power fence charger that outputs around 1 joule. However, you must install at least 3 ground rods to effectively ground your electric fence & catch more charge from the soil. More grounding rods will attract more charges from the soil, sending them back to the energizer and improving your fence power.
Step 2: Choose the right material for grounding:
A highly conductive grounding system ensures better power in your electric fence as it takes more charges back to the energizer and can bear the more current load.
That’s why it’s necessary to choose ground rod wires and clamps made of highly conductive material.
- Copper or galvanized ground rod for an electric fence?
Galvanized steel rods are commonly used for electric fence grounding because steel is a good conductor and budget-friendly.
You can also use copper for grounding an electric fence, as it’s ideal for excellent current conductivity and is corrosion-resistant. However, copper can wear down(attrition) in hard/rocky ground conditions.
Remember: You should use the ground rods and clamps made of the same materials.
- Can I use rebar to ground the electric fence?
You can also use rebar or any similar highly conductive steel rod for electric fence grounding. However, make sure that the rod is galvanized to prevent corrosion.
- What type of wire is used for grounding electric fences?
Use highly conductive 10-14 gauge 20 KV supported, insulated wires to connect the ground rods. Use the same wire to connect ground rods to the energizer.
Ensure to use a wire made of the same material as the fence wires. Using a different type of wire could result in electrical resistance or other issues that affect the overall performance of the grounding system.
- Does the electric fence ground wire need to be insulated?
Yes, the ground wire connecting ground rods & the energizer must be insulated to prevent anything from touching it and draining the current that has to reach back to the energizer and improve your fence power.
A bare grounding wire will touch the vegetation or other metal objects nearby, causing short circuits and draining your fence power.
Remember: The electric fence grounding system must have low impedance(resistance) to conduct current effectively.
Step 3: Choose the location to install the ground rods:
For better current conductivity, choose a spot where the soil is moist so that charges can easily travel to the ground rods. Try to Install ground rods at deep ground level because the deep ground layer has more moisture.
Try to install ground rods near the energizer. The first ground rod must be installed within 20 feet of the fence charger.
Ground rods should be installed at least 10 feet away from any other grounding source, such as a water pipe or another ground rod.
Cut off vegetation around the spot where installing ground rods, to prevent short circuits & power loss.
Step 5: Drive ground rods:
We can drive ground rods using several tools:
Tool 1: Hammer Drill
The most time & energy-saving method to drive ground rods is using a rotary hammer(hammer drill). Mount a ground rod driver bit to the hammer drill place. Align the ground rod vertically straight. Place the hammer drill over the rod and turn on the hammer drill. Ground rods will be driven within a minute.
Tool 2: Hammer
If you don’t have any other tool, use a hammer to drive ground rods. However, this takes more time & energy.
Use a heavy hammer with a large face(head) so it doesn’t slip & hurt your hands.
Tool 3: Small post driver:
You can also use a t-post driver to install more than half of the ground rod. Rest, you can pound with a hammer.
Tip: Water the spot where you’ve decided to install ground rods so the hard soil layers get loose.
How to install ground rods in solid rock?
To drive ground rods in hard/ground, you should use an automatic tool such as a hammer drill or electric post pounder.
Step 4: Connect the ground rods using ground rod clamps:
Ground rod camps are used to connect all the ground rods together. They are available for ½, ⅝, and ¾-inch thick ground rods.
To connect ground rods:
- Unscrew the bolts on the ground rod clamp and slide them over the ground rods.
- Peel the insulated ground wire’s ends. Insert one end in the ground rod clamps.
- At last, tighten the bolts again.
- Connect the other end of the wire to the other ground rod using clamps.
In this way, connect all the ground rods.
Step 5: Connect ground rods to the energizer:
After connecting all the ground rods, we’ll connect them to the energizer. Use the same wire between the ground rods to connect the rods to the energizer.
Slide one more clamp over the ground rod nearest to the fence charger. Peel a wire from both ends and fix one bare end in the ground rod clamps.
Wind the other bare end of the wire around the fence energizer’s ground terminal and screw the terminal tight.
Tips for installing electric fence grounding in dry/hard ground:
Very low moisture in solid(rocky) or dry ground reduces the current conductivity, and few charges reach the energizer. Follow these steps for a better grounding in dry conditions.
- Install extra ground rods.
- Use longer ground rods and install them at a shallow ground level.
- Water the soil near ground rods to improve current conductivity in the soil.
Conclusion
Remember, you can only have a strong electric fence if it’s finely grounded. A weak electric fence grounding system results in power loss from your fence & weaker or shock will be delivered.
Hopefully, you’ve understood the importance of grounding an electric fence circuit. If you still need any assistance, ask us in the comments.