Adequate grounding rods are necessary for powerful electric fencing. In the soil, current travels toward the ground rods due to moisture.
More ground rods ensure more current back to the energizer and increase the fence power.
This post will discuss why do you need 3 ground rods for an electric fence.
How electric fence grounding work?
A fence charger outputs a short-timed voltage pulse(current) that reaches the fence via a highly insulated wire.
When someone touches the fence, current enters their body, and they’ll be shocked. Current passing through the human or animal body leaks into the soil.
The free electrons in the soil travel toward the ground rods, from where they are carried to the fence charger.
Why do you need 3 ground rods for an electric fence?
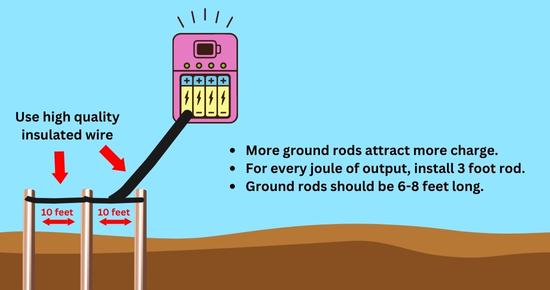
Many fence chargers(1 joule) can be grounded with one rod, but you should use at least three ground rods. More ground rods will catch more current through the soil and return back to the energizer improving the fence power.
How many ground rods you need for the electric fence depends on:
- Output joules of the fence charger(capacity).
- The level of moisture in the soil.
- Types and number of animals kept.
It’s a thumb rule to install at least 3 feet of ground rod per output joule of the fence charger; however, more is better.
For example: If your fence charger outputs 7 joules, you should install 7×3=21 feet ground rod.
Also, if the soil is dry or rocky, there will be low conductivity. Hence more ground rods will be required than normal ground conditions to catch the free electrons otherwise they’ll be lost.
The type of animal kept, and their number will decide how often the fence will be touched and how much current leaks and how many ground rods will be required to catch them.
Factors deciding the electric fence ground rod length:
1. Output joules of the fence charger:
Fence chargers are rated in joules which is the unit of energy. Output joule is the capacity(energy) of fence chargers.
A fence/charger with higher output joules has more power to cover a larger area & delivers a more sustainable shock than a low joule charger.
Thus, when someone touches a high joule fence he’ll receive a stronger jolt & more charges will drain into the earth as compared to a low joule charger.
Hence more ground rods will be required to catch electrons from the soil. More current reach back to the energizer will increase your fence power.
For example, a 10-joule charger will be more powerful than a 5-joule charger & needs more ground rods.
To calculate the exact length of ground rods required remember the rule: “3 feet rod per output joule“. Simply multiply the output joules of your fence energizer, by 3.
For example: A 10 fence charger will need at least 30 feet(10×3) of ground rods. While a 5-joule charger will need a minimum of 15 feet of the rod.
Each ground rod should be 6-8 feet long. Hence a 10-joule will need at least 4 rods of 8 feet or 5 rods of 6 feet.
However, if you have a very low-power energizer still you should install at least 3 ground rods to catch maximum electrons(current) from the soil.
2. Ground(Soil) Conditions:
Current that enters the soil through the human body travels to the ground rods due to moisture & then returns back to the energizer.
If soil is dry there is very low current conductivity & charges/electrons can’t easily travel to the ground rods; thus, most of them will be lost.
That’s why in dry & rocky ground conditions you’ll need more ground rods than the average recommendation.
Also, try to use longer ground rods because moisture increases deep in the soil.
Tips for electric fence grounding in dry conditions:
- Install extra ground rods in dry ground.
- Install ground rods at low ground levels.
- Frequently water the soil near the ground rods.
3. Type of animal and quantity:
The type of animals & their number also impacts how many ground rods will be required for grounding your electric fence.
Suppose you have kept animals that are naturally energetic and more prone to frequently touch fence wires, i.e., horses and goats.
More animals touching the fence will drain more power from the fence to the soil. So more ground rods will be required to catch the maximum charge.
The more charge returns back to the energizer will improve your fence power.
How to install ground rods for an electric fence?
Tips for grounding an electric fence:
- Use galvanized steel rods for electric fence grounding.
- Each ground rod should be 6-8 feet long.
- Drive each rod 10 feet apart from each other.
- Connect ground rods using highly insulated wire
Steps to install electric fence grounding:
Step 1: Calculate the length of ground rods required:
For per joule output of the fence charger, install at least 3 feet of ground rod. For example: If you have a fence charger that outputs 12 joules, you should install 36 feet of ground rods. Each rod must be 6-8 feet long.
Step 2: Choose the thickness and quality of ground rods:
Use ⅝ or ¾-inch thick galvanized steel rods for grounding your electric fence. Galvanization applies a protective zinc coating layer over metal to prevent rusting. Use ground rods that are made of highly conductive metals.
Step 3: Install/drive ground rods:
Drive the ground rods using a post driver. Then hammer the rod until it’s a few inches out of the ground. Place ground rod clamps over the rods.
Step 4: Connect ground rods:
Use a highly conductive insulated wire(i.e., 6-10 gauge, copper).
Install ground rod clamps.
Peel wire from both ends, place it in the ground rod clamps hole and tighten the screw.
Step 5: Connect ground rods to energizer:
After you’ve installed and connected the ground rods, attach the ground rods to the fence energizer’s ground terminal using the same thick, highly conductive insulated wire(copper is preferable).
- Peel wire from both ends.
- Hook one end into the ground rod clamp and tighten the screw.
- Wind the other end of the wire around the energizer ground terminal and tighten the terminal screw.
- Make sure that the connections are not loose.
Using insulated wire to connect ground rods and energizer terminals will prevent short circuits and power loss from your fence.
Step 6: Test electric fence grounding
After setting up the electric fence test the grounding using a voltmeter or any fence tester.
- First of all short out your electric fence at least 100m away from ground rods using metal rods.
- Make sure that the fence voltage drops below 1000V.
- Now take a fence tester or voltmeter. Insert the black probe of the fence tester into the ground(soil).
- Attach the tester to the ground rods.
- If the voltage is below 500V, then grounding is fine.
- If the voltage exceeds 500V, you should install more ground rods.
Frequently Asked Questions
- What happens if you don’t have enough ground rods for an electric fence?
If you’ve installed inadequate ground rods, all the current leaked into the soil won’t be cached, resulting in power loss & weak fence.
- Can you use a T-post as a grounding rod?
Although T-posts are made of steel that’s a conductor, using it as a grounding rod isn’t recommended. Grounding rods must be made of highly conductive galvanized steel or copper.
T-posts can rust due to moisture in the soil, resulting in reduced current conductivity, ineffective grounding & a weak fence.
Also, it’s difficult to connect ground rods to each other & to the energizer.
Conclusion:
For Ideal results, you should install at least 3 ground rods 10 feet apart from each other. Connect ground rod and energizer using highly conductive & insulated wire.
Install 3 feet of ground rods for per joule output of the fence charger. Keep the soil moist near the rods.
If you still need any guidance, ask us in the comments below.
Related Posts:
Generally, your home or construction needs two ground rods.
Maybe, but electric fencing needs at least 3 ground rods.