Fence post spikes are quite an innovative tool commonly used to install wood posts without the hassle of digging post holes & using concrete. A post spike has two parts; the spike/anchor gets driven into the ground within a couple of minutes, providing ease in DIY fence installations. The holder(bracket/shoe) holds the fence post out of the ground, saving it from moisture & rotting and minimizing repair costs.
Similarly, you can unscrew the bolts to remove the fence posts from spikes. The post spike itself can be removed from the ground & reused, hence making it a cost-effective option than installing wood posts in concrete.
You can install fence post spikes(met post) using low-cost handy tools like a sledgehammer or manual post driver. Although these tools are the cheapest, they require a little more time & effort than automatic tools. An electric post-pounder or jackhammer can accomplish more work in less time, saving physical effort.
Do fence post spikes really work?
A fence post spike, also known as a no-dig fence post spike, is an excellent solution to make removable fence posts without digging holes & using concrete. They are designed to be directly driven into the ground & can be easily removed, making the installation & maintenance easier.
They are ideal, especially for fences that don’t have to bear a lot of weight & tension, such as short area fences, garden fences or privacy fences at home.
Another benefit of fence post spikes is that the holder(bracket) catches the post out of the ground, hence protecting it from rotting caused by moisture in the soil.
Below, we’ve discussed all DIY methods and tips to install fence post anchor ground spikes.
Drawbacks & scenarios where post spikes may not work:
- Fence post spikes will lean(shift) if the ground is soft & the fence has to bear a lot of weight & tension. For example, animals constantly pushing against the fence or a wood panel fence facing a lot of wind will gradually make the post spikes bend or shift. If we talk about strength, posts set in concrete bases bear more tension.
- If the ground is extremely hard/rocky, post spikes(met posts) can bend during installation.
- Using fence post spikes for heavy decking & patios isn’t a great idea. They’re made for lighter fences, not ideal for heavy deck or patio posts. Deck or patio posts need a solid concrete base for stability and durability. Using spikes could lead to a wobbly deck and potential damage over time.
- Some might consider to install post spikes in concrete for extra stability, but this will increase the cost. Also, the contraction or expansion of metal & concrete with the changing seasons makes the spikes easier to pull out of the ground. Also, post spikes can’t be recovered from concrete; hence, they’ll bend & ultimately become useless.
Tips to choose the right fence post spikes:
Fence post anchors/spikes are available for square and round posts. Choose fence post spikes made of sturdy, heavy gauge galvanized metal with powder coating to prevent rusting. While buying, you should carefully choose the design, holder size as per your post’s width & the suitable length of the spike(anchor) according to your post’s length.
1: Choose the right design:
Post spikes are available in different holder/bracket designs. They all work the same(hold the post), but the post-fastening method differs.
- Most commonly used spikes offer bolts to fasten & remove fence posts.
- Others have holes in the holder to drill screws into the wood.
- The third one has a simple opening or the holder, bent inwards to grip the post.
The most ideal post spikes are ones having bolts. They are ideal as you can remove fence posts very easily. They also allow you to adjust slightly thin or thicker wood posts. While the other designs don’t offer that ease of removing fence posts. With time, the wood post expands, and it’ll be stuck into the spike.
2: Choose the holder size according to your post’s dimensions
Post spikes are available for square & round posts of various sizes. Pick the right size according to your post’s dimensions. Use a measuring tape if you’re unsure about your post’s thickness.
Remember: The inner size of the post-spike bracket(holder) is slightly less than the outer dimensions, such as a 4×4 post-spike can have an inner dimension of 3.5×3.5. The good thing is that the spike’s holder can be slightly opened wide or closed to adjust slightly larger or thinner fence posts. That’s why investing in post spikes with bolts is better.
Square post spike holders sizes:
- 2×2 in (50×50 mm)
- 3×3 in (75×75 mm)
- 4×4 in (100×100 mm)
- 6×6 in (150x150mm)
Round post spike holder diameters:
- 80mm (3.15 in)
- 100mm (4 in)
- 120mm (4.7 in)
- 140mm (5.5 in)
3: Choose the right anchor(spike) size:
Post spikes anchors are available in different lengths from 18-30 inches. Spikes with long & wide anchors grip the soil better, providing greater strength to the posts. Remember the rule: “1/3 of the post should be under the ground”.
- For a 4-foot fence post, opt for a 24-inch anchor/spike.
- For a 6-foot or higher fence post, choose at least a 30-inch spike.
4 DIY Methods to Install Fence Post Anchor Ground Spikes:
To install fence post spikes:
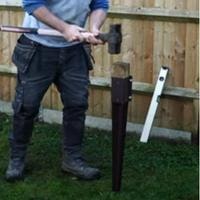
- Method 1: Align the ground spike anchor straight at the desired spot facing the right(desired) direction. Insert a wood block inside the post holder(bracket) and hammer it.
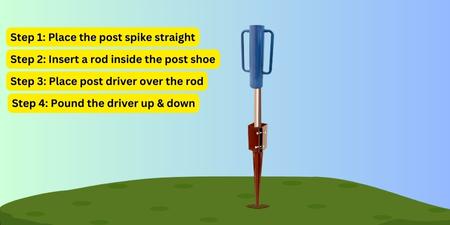
- Method 2: Insert a long metal rod inside the post-spike holder(shoe). Place a manual or electric post driver over the rod and pound.
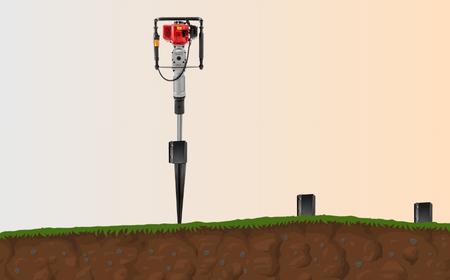
- Method 3: You can also use a jackhammer(demolition drill) to drive the fence post-spike.
Tip: Use a level tool to check the alignment of post spikes.
Follow the complete guide below:
Method 1: Install post spikes with sledgehammer
The most cost-effective tool to install a post anchor ground spike is a sledgehammer. This method takes a couple of minutes to drive a fence post spike.

Tools Required:
- Sledgehammer or a heavy hammer.
- A wood block that fits in the post-spike bracket(shoe) and is 8-10 inches long.
- A level tool to balance.
Steps:
- Take the fence post spike at the desired spot.
- Insert a wood block inside the post spike’s holder.
- Align the post spikes vertically straight, facing the right direction.
- Drive it a few inches, holding it with one hand until it stays in the ground without support.
- Hit the hammer straight; otherwise, spikes may lean.
- After driving the post spike up to a few inches, continuously use a level tool to check its alignment(balance). Check the level from all sides of the spikes.
- If the post spike are leaning, pull/push them in the right direction.
- Hammer the post spike until it’s driven up to the holder(shoe/bracket).
- After the post spike is driven, unscrew the bolts on the bracket using a spanner, insert the post in, and screw the bolt again using a spanner.
- If you use fence post anchors with holes in the holder, drive nails to secure the post to the spikes.
This way, you can drive fence spikes without any costly tools.
Method 2: Install post spikes with a manual post driver
A manual post is quite a cheap tool, widely used to drive T-posts & metal posts. Using the same technique, we can install post spikes quite easily.
Tools Required:
- Manual post driver
- Metal rod
Steps:
- Put a long wood or metal bar(3-4 feet) vertically in the post anchor’s bracket.
- Place the post driver/pounder over the wood bar.
- Keep all the things straight and start pounding the driver up and down. Sharp spike edges will start driving into the ground.

- A post-pounder will take hardly 3-5 mins to drive a 24 or 36-inch spike. But make sure to keep the spike vertically straight.
Method 3: Install post spikes using an electric post driver:
In hard ground conditions, where a manual tool may not work or requires a lot of force, an automatic post driver(electric/gas-powered) works well. An electric post driver is quite a powerful post-driving tool to is ideal for installing a large number of posts in posts with minimum efforts.
Steps:
- Place a wood or metal rod (3-4 feet) in the spike bracket, and place the post driver over the rod.
- Ask someone to hold the spike until it’s driven a few inches into the ground and doesn’t need further support.
- Start the machine and slightly keep pulling it downward. Keep leveling the spike using a level tool.

Method 4: Install post spikes using Jackhammer
Same as an electric post driver a jackhammer (hammer drill) is another powerful, saves time & manual efforts. Although it’s used for demolition purposes, but can be used to drive fence post spikes quite easily.
Tools Required:
- Jackhammer
- A flat metal piece that fits in the post-spike bracket to prevent it from being damaged.
Steps:
- Pinch the fence post spike into the ground so it doesn’t fall while inserting the jackhammer bit.
- Insert a flat metal/wood piece in the bracket so the jackhammer’s bit doesn’t damage the base.
- Lift the jackhammer and insert the bit inside the post-spike bracket.
- Turn on the jackhammer & keep pulling it down.
- After driving the post spike up to a few inches, stop the machine & check if the spike is straight.

- If the metpost is leaning, pull it in the right direction.
- Continue pounding until the post anchor is driven up to the bracket(shoe).
How to remove fence post spikes from the ground?
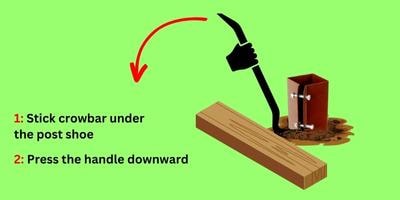
We will apply lever physics to remove fence post spikes from the ground using a crowbar, pickax, hi-lift jack(farm jack), or car jack. Except for the crowbar & pickax methods, you’ll necessarily need a hi-lift or car jack.
Method 1: Using a crowbar or pickaxe:
- Place a rectangular wood log a few inches away from the post-spike bracket.
- Stick the crowbar’s sharp end under the post bracket.
- Fix the wood log under the crowbar to apply tension(leverage).
- Apply force on the handle and increase the weight until the spikes are removed from the ground.

Method 2: Using hi-lift/car jack along a C/G clamp, pipe wrench, or bench vice
A hi-lift jack(farm jack) or a car jack are the best tools to remove fence posts & post spikes from the ground with minimum force. Along with a jack, you’ll also need a C/G clamp, pipe wrench a bench vice to catch the post spike’s holder.
Steps:
- Mount a vice/clamp or pipe wrench on the post spike’s bracket(holder). Make sure that the tool is high enough so the jack can fit under it.
- Otherwise, fasten a post or wood block inside the spike’s bracket (holder) first. Then, mount any tool to that wood block/post.
- Fix the hi-lift jack or car jack under the wrench (or any tool fastened to the post-spike bracket). Then press the handle downwards, pull it upward, and repeat.
- The lifter(runner) of the jack will start moving upward, lifting(pulling) the spike out of the ground.
Tip: Fasten a wood block or fence post inside the bracket to prevent it from bending while removing.
Removing a stuck post from a fence post spike(anchor):
The type of fence post spikes that offer bolts on the holder(bracket) to fasten & remove fence posts are ideal. However, there are various designs of post spikes where the post is simply slid in or screws are drilled through the holes on the shoe(bracket). So, with time, wood posts expand & get stuck in the post holder.
Steps to remove a stuck post from fence post anchors(spikes):
- If you’ve used met posts that require a screw to secure the post in the bracket, first use a reverse action screw drill to remove the screws from the wood.
- Adequately lubricate the post while the spike is still in the ground. Then, try to shake & rotate the post on all sides while pulling it upward. Tap the spike’s bracket to make the fence post loose & keep it pulling upward.
- Still, if it doesn’t work, then take a C/G clamp or a pipe wrench & fasten it on the post. Then, take a hi-lift(farm jack) or a car jack & fix its nose(lifter/runner) under the wrench or clamp attached to the post. As you press the jack’s handle down & up, the lifter will start moving up & ultimately, the post will be pushed upward.
- If nothing works, cut the post above the post spike’s bracket. Use a flame gun to burn the wood inside the spike as much as possible. Then, use a drill with wood drill bits to remove chunks of wood. Drill holes from different angles. Although it’s a time-consuming process, it’ll surely work.
To prevent all this hustle, you should buy post spikes with bolts that allow you to fasten & remove fence posts anytime.
Conclusion
As per my fence installation experience, I would say post spikes are ideal for light to medium-weight fences that don’t have to bear excessive tension. But not suitable for heavy-duty or large-area fences. It’s because the anchor is sharp, although it offers ease of installation, but if the fence has to bear excessive load & tension, it’ll shift or bend. So you should use it for temporary, lightweight & short-area fencing.
Installing a fence post anchor ground spike is quite simple & easy. While installing, keep the post spikes straight (use a level tool) and face them in the right desired direction.
The most cost-saving technique to drive post-spike is using a sledgehammer or a manual post-driver. While other automatic tools, such as a hammer drill or electric post driver, can help you accomplish more tasks in quite less time.
If you still need any assistance, ask us in the comments.
Related Posts

