A complete removable fence post is not available in the market. The good news is that we can make our regular square/round wood or metal fence posts removable with DIY tools, such as a post sleeve or PVC pipes, fence post spike, or post shoes.
Please keep in mind that these tools are used in different installation conditions & need different tools for installation.
For example:
- Post sleeves are installed in concrete after digging holes, and the post is slid in.
- Fence post spikes get directly driven into the ground, and the fence post is fastened into the bracket(shoe).
- However, post shoes(holders) are screwed over already set concrete structure i.e. floor, slab with bolts, and the post is fastened in them.
In this post, we’ll teach you to make removable fence posts with a variety of low-cost DIY tools such as fence post sleeves, post spikes & post shoes.
Read the complete guide below:
Complete Guide to Make Removable Fence Posts:
Method 1: Post sleeves allow you to slide in or out the fence posts anytime & also prevent the post from exposure to moisture & rotting. The concrete base will grip the post sleeve underground & the sleeve will hold the fence post.
Steps to make a removable fence post with post sleeves:
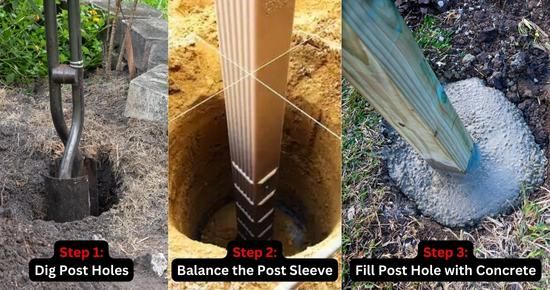
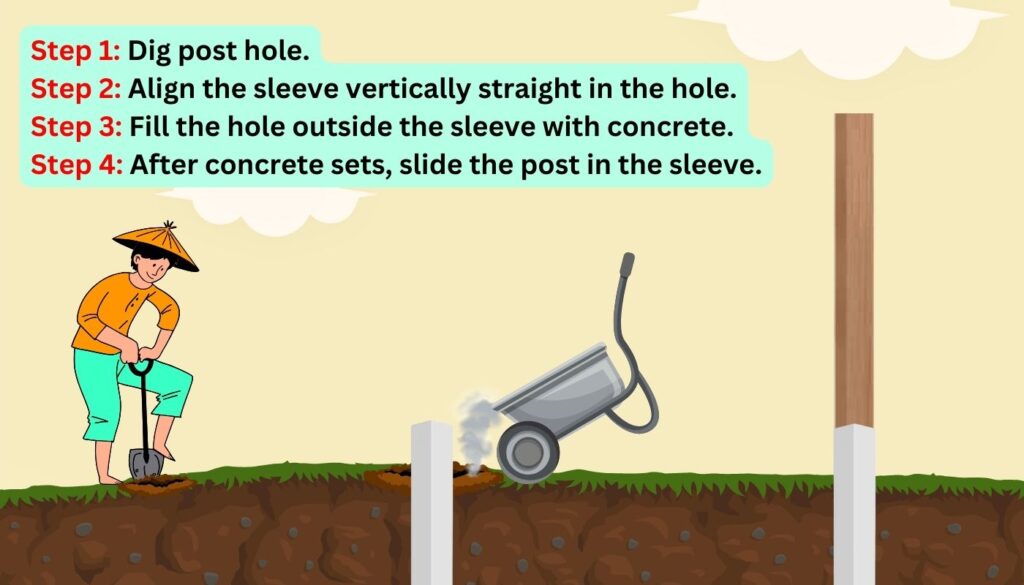
- Dig post holes.
- Then close the bottom end of the post sleeve & insert it in the hole.
- Fill the hole with a concrete mixture.
- After the concrete is set, slide the fence post into the sleeve.
Method 2: Fence post spikes(met posts) are ideal for making a removable wood post without digging post holes and using concrete. They are used for square & round wood posts. It’s a simple fence post holder with a 2-3 feet anchor that gets driven into the ground while the fence post is fastened in the post shoe(holder). Screws are available to fasten & remove the fence post. You can also remove spikes from the ground for use later.
Method 3: Fence post shoes(bolt-down post shoes) help you install removable fence posts on already set concrete(floor, slabs). It’s a simple post holder(bracket) that gets screwed to concrete floors or slabs with bolts. The post is then fastened inside the shoe(bracket) like fence post spikes.
Below we’ll discuss each tool & method in detail:
Method 1: Make Removable Fence Posts using Post Sleeves
Post sleeves are mainly used as post-protective covers & to give a nice look to your fences. They also provide protection and durability to the undergrounded part of the fence posts, deck posts, patio posts & mailboxes, extending their lifespan and minimizing maintenance requirements.
The most important step is to choose a post sleeve size according to the dimensions of your fence posts.
Follow the step-by-step guide below:
Step 1: Choose the right post sleeve
Post sleeves are usually made of vinyl(PVC), aluminum, or steel. Vinyl post sleeves are lightweight, cheap, & commonly used for square or rectangle wood post sizes. For round posts, PVC pipes can be used. While steel post sleeves are also used to make round or square metal posts removable.
For square wood posts, Vinyl sleeves are commonly available in the following sizes:
- 3×3 inch post sleeves
- 4×4 inch post sleeves (most used)
- 4×6 inch post sleeve (for rectangular posts)
- 5×5 inch post sleeves
- 6×6 inch post sleeves (most used)
Remember: The inner & outer dimensions of a product could be different. So, you must compare your fence post’s dimensions with the inner dimensions of the post sleeve.
Note:
- Round post sleeves may not be available for all post diameters.
- At least 1/3rd of a fence post should be under the ground, so you’ll need an equal length of sleeves for making each removable fence post.
Step 2: Dig post holes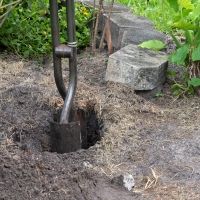
To install fence post sleeves, the first step is to dig fence post holes. You can dig fence post holes with a variety of manual & automatic tools.
Manual post-hole digging tools:
- A shovel or pickaxe (recommended for digging only a few post holes).
- A manual auger is an efficient digging tool for soft or hard ground & takes less time & energy.
- A post-hole digger is also helpful on soft ground but takes a lot of energy.
Note:
- Manual digging tools should only be used for digging a few post holes as they take a lot more energy & time.
- For sturdy fencing, the post hole size should be 3 times the post’s diameter & must be deep enough for 1/3rd of the post to be set in concrete.
Automatic digging tools:
An auger drill is a quite powerful & time-saving tool for digging post holes, especially through hard ground and for digging a large number of post holes.
Tip: After digging post holes, pound the base of the hole with a hand compactor or any heavy tool to level the surface.
Step 3: Cut the post sleeve equal to the post hole’s depth
If using a Vinyl post sleeve, insert it in the post hole. Mark it up to a few inches above the ground level. Then, mark the post sleeve by drawing straight lines on all sides. You can use a handsaw or electric saw to cut vinyl post sleeves.
Remember: If using metal sleeves, you’ll need a metal cutting saw, so it’s better to buy the exact size as per your needs.
Step 4: Close one end of the sleeve
Usually, post sleeves are open from both ends. If you directly install them without closing the bottom end, the concrete mixture will enter the sleeve and disturb the balance of the posts. Also, the moisture & bacteria in the soil will decay/corrode the fence post.
That’s why you must close the bottom end of the post sleeve. If installing a vinyl(PVC) post sleeve, you can use duct or electrical tape to close one end. While for metal sleeves, weld a metal plate at the bottom end.
Tips:
- Drive nails/screws through the bottom of the vinyl post sleeve in all directions so the fence sleeve gets fixed under the concrete.
- However, if you’re installing metal sleeves, weld a metal plate at the bottom end of the sleeve. It’ll make the whole fixture sturdier.
Step 5(Last): Set the fence post sleeve in concrete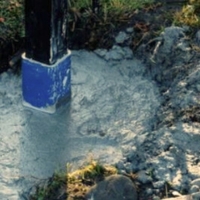
Although fence post sleeves can be directly installed in the ground, they won’t help you in the long run. That’s why, for sturdier & long-lasting fencing, you must set them in concrete.
Steps to install:
- Place the fence post sleeve inside the post hole with the closed side downward.
- Insert the fence post inside the sleeve & make them face the right direction.
- Use supportive posts or ask someone to hold the fence post vertically straight.
- To check the balance(level) of the fence post, use a level tool.
You’ll need fast-setting concrete to fix the post sleeves into the ground as it dries quickly within 30-40 mins. In comparison, the normal building concrete will set in around a day.
- Fill the post hole(around the post) with the dry concrete mixture up to ground level.
- Then, pour plenty of water into the post hole to wet all the dry concrete.
- At last, use a cement trowel to level the concrete mixture up to the ground level.
Method 2: Make Metal Posts Removable using a Large Diameter Post
Here’s a step-by-step guide based on my personal experience to make round metal chain link fence posts removable:
Materials needed:
- The metal fence post to be made removable(I used a 2-inch round chain link post in my case).
- Slightly Larger diameter posts to be used as a post sleeve and to support the main fence post (I used 2 1/8 inches in my case).
- Post driver
- Pipe wrench & a jack to remove the post.
- Chain link post concrete mount & concrete fixing bolts (if you want to set posts on concrete).
Step 1: Choose a larger diameter Post:
The outer post that acts as the post sleeve should be slightly larger in diameter than the post that you want to make removable. I used a piece of 2 1/8-inch metal post for my 2-inch main chain link post. You’ll need 3-4 feet pieces of slightly large diameter metal post to make each chain link fence post removable.
Step 2: Drive the larger post into the ground:
Use a post driver or hammer to drive the larger posts into the ground. I drove them up to 2 feet deep. Since the larger posts are open from the bottom, they will fill with soil as you drive them.
Step 3: Remove the post:
Fasten a wrench around your main chain link fence post and lift it using a car jack or apply any other method you know to remove the post out. The post will also have mud stuck in it. Tap the post to get rid of the dirt inside.
Step 4: Drive the larger post again:
Now pound the larger posts deeper into the ground up to 3 feet down the earth’s surface. The post will get stuck in the soil and will provide strength to the main chain link fence post. Understand the phenomena of doing all this: We’ll drive the larger post and when we remove the post it’ll get out all the soil along with it. By doing this the ground will get empty and you can drive the fence post more deep.
Step 5: Slide Main Chain Link Fence Posts:
Slide your actual chain link fence posts inside the larger posts. This way, both posts will be set underground and removable whenever you need.
Step 5: Concrete option (Optional):
If you want extra strength, you can set the larger/outer posts in concrete. Pour concrete around the larger posts and let it set. This will provide additional stability.
Using Chain Link Post Concrete Mounts on Concrete Structures:
If you’re installing the metal posts on a concrete structure, use chain link post concrete mounts. Screw these mounting brackets onto the concrete using concrete fixing bolts. Then, fasten the posts in the brackets using regular bolts.
By following these steps, I was able to make all four of my chain link fence posts removable, giving me the flexibility to adjust or remove them whenever I wanted. It may take a bit of effort, but the result is a sturdy and removable fence setup.
Method 3: Use Fence Post Spikes to Make Removable Fence Posts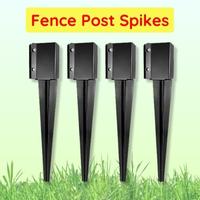
Fence post spikes/anchors, or met posts, are ideal for installing a removable fence post without digging post holes. They are quite a convenient alternative to traditional concrete foundations for fence posts. But make sure to choose the heavy-duty material and the right size of the post spike according to your post’s dimensions.
How do fence post spikes work?
Fence post spikes work such that the anchor(spike) is driven into the ground using a sledgehammer or a post driver. Then the fence post is fastened in the post shoe/holder by screwing the bolts.
Similarly, you can remove fence posts by unscrewing the bolts on the spike’s bracket. The fence spike itself can be easily removed from the ground and reused.
Drawback:
- The fence post spikes can shift or lean over time if the ground is too soft.
- It may also bend while driving if the ground is extremely rocky.
Below is the step-by-step guide to installing fence post spikes:
Step 1: Choose the right fence post spikes
- Opt for heavy-duty metal post spikes:
Fence post spikes/met posts are made of steel, carbon steel, aluminum, or mixed alloys. Choose powder-coated, thick gauge, heavy-duty steel spikes for long-term results.
- Compare the holder with the fence post perimeter:
Also, choose the post spike’s holder size according to your post’s perimeter. Post spikes holders are usually available in 2×2, 3×3, 4×4, and 6×6 inches sizes for square fence posts.
- Choose spike(anchor) length according to post size:
It’s advisable to choose a 24-inch spike(anchor) for a 4-foot post and at least a 30-inch spike for a 6-foot or higher post.
- Compare the post sleeve’s inner diameter to the post’s diameter:
Remember that the post spike holder’s inner dimensions should be equal to the post’s size. Make sure to verify the dimensions, as sometimes it’s written slightly differently from the actual.
For example, a 6×6 post spike holder has an inner diameter of 5.5×5.5. So you must compare the fence post’s size to the inner dimensions of the post spike’s holder. Similarly, choose round post spikes according to your post’s diameter.
Tip: Opt for post spikes that offer bolts on the holders to adjust slightly larger or thinner fence posts.
Step 2: Drive fence post spikes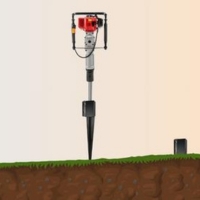
To drive fence post spikes into the ground, you can use a sledgehammer, manual or automatic post driver, or a jackhammer(demolition hammer).
Method 1: Install fence post spikes using a sledgehammer
Tools required:
- Hammer(Sledgehammer)
- A wood block(longer than the spike’s header/bracket)
Steps to install:
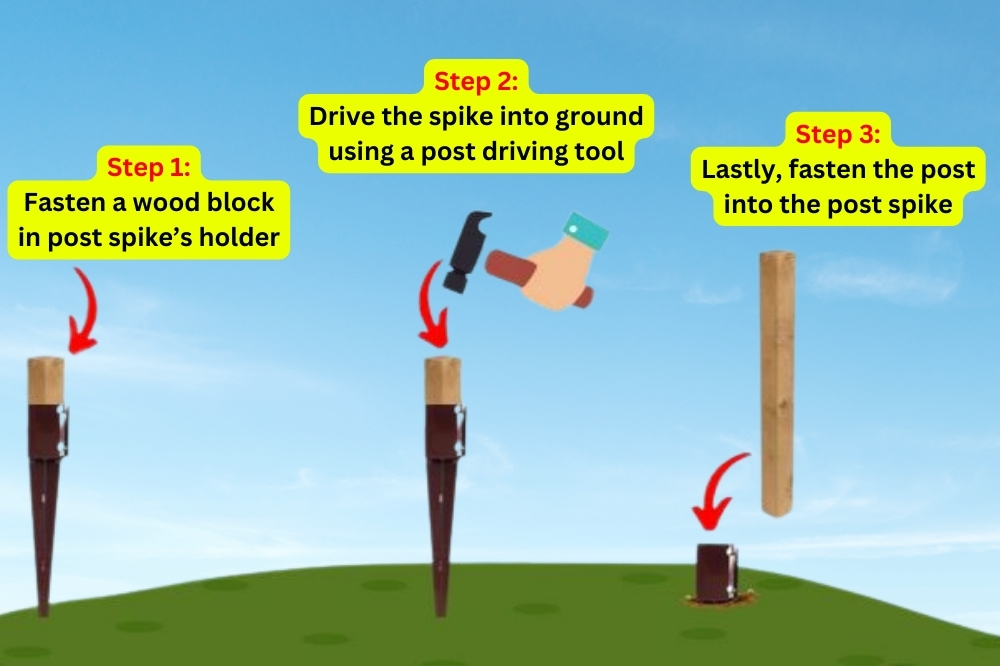
- Position the fence post on the right spot and location.
- Take a wood block lengthier than the post spike holder(bracket) & place it inside.
- Hit the wood in the post spike holder(bracket) with a sledgehammer or any hammer.
- Continuously use a level tool to check if the fence post spike is level(balanced).
- If the post spike is inclining, pull it in the right direction to align it straight.
Method 2: Install fence post spikes using a post driver
You can also use a manual or automatic post driver to pound the fence post spike into the ground.
Tools required:
- Post driver
- Wood or metal rod
Steps to install:
- Place a long metal or wood rod inside the fence post spike’s holder.
- Place the post driver over the rod. Pound the driver up and down & the fence spike will be slowly driven into the ground(soil).
- Once the fence post spike is installed, insert the fence post into the spike and secure it with screws or bolts.
- It’s important to ensure the fence post is straight before screwing the bolts tight.
- Similarly, you can use a demolition hammer to pound the spike downward. But insert a piece of wood to prevent any damage.
Step 3: Screw the fence post into the post spike’s holder:
After driving post spikes into the ground, the last step is to screw posts into the spike’s holder. If you’ve installed post spikes having screws on the bracket(holder), unscrew them using a spanner. Then insert the fence post in & screw the bolts again.
If you’ve got post spikes having holes in the holder/bracket, simply slide the fence post in & drill screws using a screwdriver drill.
Method 4: Use Bolt Down Fence Post Shoes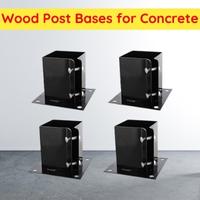
Bolt-down post shoes are used to install removable fence posts on already set concrete structures(floor, slabs) & wood floors. It is a simple post base (holder) that attaches wood posts to concrete.
The base gets screwed on the concrete/wood surface with concrete fixing bolts. Then, the fence post is fastened in the base with bolts. Similarly, It’s easy to remove fence posts by simply unscrewing the bolts & the post-shoe is also removable.
Tip: Only use screws/nails specially designed for concrete.
Steps to install fence post shoes: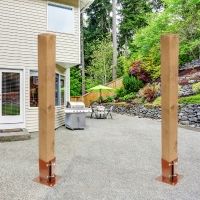
- Use the level tool to ensure the concrete surface is straight (level).
- To drill holes, place the post-shoe on the exact spot where you want to install the fence post.
- Then, mark spots on the concrete through the holes on the post-hole shoes.
- Get high-quality 6-inch concrete bolts that fit the holes on the post-shoe.
- Now, take a drill along an appropriate drill bit according to the bolts & size of holes on the post shoe(bracket).
- To keep the screws fastened in the concrete, take plastic wall anchors & after drilling holes, drive them into the holes using a hammer.
- Now, place the fence post-shoe on concrete such that the post-shoe holes come exactly over the drilled holes.
- Use an electric screwdriver/drill to screw bolts into the concrete holes. You can also use a spanner to tighten the bolts in the hole. However, using a screwdriver drill is ideal.
- After installing the fence post shoe, insert the fence post into the post bracket. Tighten the fence post into the shoe/bracket by screwing bolts with a spanner(wrench).
- Use level to ensure that the fence post is straight.
- In the same way, you can remove the fence post by unscrewing the bolts. You can also remove fence post shoes by unscrewing the bolts driven into the concrete.
Conclusion
If you want to make wood posts removable, we recommend using Vinyl(PVC) fence post sleeves as they are less costly, & long-lasting options & are available for different post dimensions. However, for heavy-duty steel posts, use steel post sleeves. T-posts are also removable & can be used to install lightweight fences.
Fence post spike helps make removable fence posts without digging post holes; they cost a little more, but they are useful for light-duty purposes. While fence post shoe works well on already set concrete.
If you still need any assistance, ask us in the comments below.
Related Posts: